takaya030の備忘録

PHP、Laravel、Docker などの話がメインです

Docker で sinatra の開発環境を構築

Docker で sinatra の開発環境を構築したときの手順メモ

検証環境

Windows10 Home Edition
VirtualBox 6.1.10

# Docker Host OS (CoreOS)
$ uname -a
Linux default 4.9.93-boot2docker #1 SMP Thu Jul 19 18:29:50 UTC 2018 x86_64 GNU/Linux

Docker version 18.06.1-ce, build e68fc7a
docker-compose version 1.20.1, build 5d8c71b

sinatra インストール手順の概要

  1. 最初に sinatra の初期プロジェクトが入った Docker イメージを作成する ( base イメージと呼ぶ)
  2. base イメージからコンテナを作成し、初期プロジェクトのフォルダを docker cp でホストOS側にコピーする
  3. base イメージを元にホストOS側のプロジェクトを上書きするイメージを作成する ( app イメージと呼ぶ)
  4. 以後の開発作業はホストOS上のプロジェクトのソースコードを変更し、 app イメージを作り直すこととなる

初期のディレクトリ構成

初期は sinatra フォルダの中は docker-compose.ymlDockerfile のみ

sinatra
|   docker-compose.yml
|   Dockerfile

docker-compose.yml

base イメージを作成するための内容

version: "3.4"
services:
  base: 
    build:
      context: .
      dockerfile: ./Dockerfile
      target: "sinatra-base"
    image: takaya030/sinatra-base

Dockerfile

こちらも base イメージを作成するための内容

FROM ruby:2.7.1 as sinatra-base
LABEL maintainer "takaya030"

RUN apt-get update -qq && \
    apt-get install -y build-essential libpq-dev nodejs && \
    apt-get clean && \
    rm -rf /var/lib/apt/lists/*

# insall sinatra
RUN mkdir /myapp
WORKDIR /myapp
RUN bundle init && \
    echo 'gem "sinatra"' >>Gemfile && \
    echo 'gem "sinatra-contrib"' >>Gemfile && \
    bundle config set path 'vendor/bundle' && \
    bundle install

CMD ["true"]

base イメージのビルド

$ cd sinatra
$ docker-compose build base

プロジェクトフォルダをホストOS側へコピー

下記のコマンドで base イメージからコンテナを起動します
(コンテナ内で true コマンドを実行しているだけなのですぐに終了します)

$ docker-compose up -d

コンテナの中のプロジェクトフォルダをホストOS側へコピーします
これが実際の開発環境になります

$ docker cp sinatra_base_1:/myapp .

# "sinatra_base_1" は先ほど起動したコンテナの名前

コピーが完了すると sinatra/myapp/ フォルダ以下に開発環境が作成されます

sinatra
|   docker-compose.yml
|   Dockerfile
|   
\---myapp

コピーが完了したらコンテナを削除します

$ docker-compose rm

app イメージ作成のための設定追加

docker-compose.yml

下記の内容に変更します

version: "3.4"
services:
  base: 
    build:
      context: .
      dockerfile: ./Dockerfile
      target: "sinatra-base"
    image: takaya030/sinatra-base
  app: 
    build:
      context: .
      dockerfile: ./Dockerfile
      target: "sinatra-app"
    image: takaya030/sinatra-app
    ports: 
      - "3000:3000"
    volumes:
      - ./myapp:/myapp
    working_dir: /myapp
    command: "bundle exec ruby myapp.rb -o 0.0.0.0 -p 3000"

Dockerfile

下記の内容に変更します

FROM ruby:2.7.1 as sinatra-base
LABEL maintainer "takaya030"

RUN apt-get update -qq && \
    apt-get install -y build-essential libpq-dev nodejs && \
    apt-get clean && \
    rm -rf /var/lib/apt/lists/*

# insall sinatra
RUN mkdir /myapp
WORKDIR /myapp
RUN bundle init && \
    echo 'gem "sinatra"' >>Gemfile && \
    echo 'gem "sinatra-contrib"' >>Gemfile && \
    bundle config set path 'vendor/bundle' && \
    bundle install

CMD ["true"]

#=========================================
FROM sinatra-base as sinatra-app

COPY ./myapp /myapp
WORKDIR /myapp

CMD ["bundle","exec","ruby","myapp.rb","-o","0.0.0.0","-p","3000"]

app イメージのビルド

$ docker-compose build app

app イメージの動作確認

myapp.rb 追加

下記の内容で myapp/myapp.rb を追加

Bundler.require
get '/' do
    "Hello world!" 
end

Docker コンテナの起動

$ docker-compose up -d

アクセス

web ブラウザで http://192.168.99.100:3000/ にアクセスして下の画像のように表示されば正常動作しています

f:id:takaya030:20200607161005p:plain

gem パッケージの追加方法

現在インストールされているパッケージを確認

$ docker-compose run --rm app bundle list
Gems included by the bundle:
  * backports (3.17.2)
  * multi_json (1.14.1)
  * mustermann (1.1.1)
  * rack (2.2.2)
  * rack-protection (2.0.8.1)
  * ruby2_keywords (0.0.2)
  * sinatra (2.0.8.1)
  * sinatra-contrib (2.0.8.1)
  * tilt (2.0.10)
Use `bundle info` to print more detailed information about a gem

myapp/Gemfile に追加したいパッケージを記述

--- a/Gemfile     Sun Jun 07 13:28:41 2020
+++ b/Gemfile     Sun Jun 07 21:10:26 2020
@@ -7,3 +7,5 @@
 # gem "rails"
 gem "sinatra"
 gem "sinatra-contrib"
+gem "omniauth"
+gem "omniauth-twitter"

下記のコマンドでパッケージをインストール

$ docker-compose run --rm app bundle install

正常にインストールされたか確認
( omniauth 関連のパッケージが追加されているのを確認)

$ docker-compose run --rm app bundle list
Gems included by the bundle:
  * backports (3.17.2)
  * hashie (4.1.0)
  * multi_json (1.14.1)
  * mustermann (1.1.1)
  * oauth (0.5.4)
  * omniauth (1.9.1)
  * omniauth-oauth (1.1.0)
  * omniauth-twitter (1.4.0)
  * rack (2.2.2)
  * rack-protection (2.0.8.1)
  * ruby2_keywords (0.0.2)
  * sinatra (2.0.8.1)
  * sinatra-contrib (2.0.8.1)
  * tilt (2.0.10)
Use `bundle info` to print more detailed information about a gem

参考サイト

qiita.com

qiita.com

Vagrant で CentOS8 + Docker 環境構築

VagrantVirtualBox に CentOS8 の VM を構築したときの手順メモ

検証環境

Windows10 Home Edition
VirtualBox 6.0.16
Vagrant 2.2.5

Vagrant Box ファイル追加

vagrant box add コマンドで CentOS8 の Box ファイルを追加します。
provider は 5) virtualbox を選択します。

C:\>vagrant box add generic/centos8
==> box: Loading metadata for box 'generic/centos8'
    box: URL: https://vagrantcloud.com/generic/centos8
This box can work with multiple providers! The providers that it
can work with are listed below. Please review the list and choose
the provider you will be working with.

1) docker
2) hyperv
3) libvirt
4) parallels
5) virtualbox
6) vmware_desktop

Enter your choice: 5

vagrant box list コマンドで Box ファイルが追加されているか確認可能です。

C:\>vagrant box list
generic/centos8   (virtualbox, 2.0.6)

Vagrantfile の作成

作業用ディレクトリを作成して vagant init を実行します。

D:\>mkdir vagrant\centos8

D:\>cd vagrant\centos8

D:\vagrant\centos8>vagrant init generic/centos8

作成された Vagrantfile を下記の内容に変更します。
仮想マシンのメモリを 2014MB にしています。
プロビジョニングでは Docker 関連のセットアップを行っています。

--- a/Vagrantfile Sat Feb 01 18:11:48 2020
+++ b/Vagrantfile Sun Feb 02 00:27:02 2020
@@ -32,7 +32,7 @@

   # Create a private network, which allows host-only access to the machine
   # using a specific IP.
-  # config.vm.network "private_network", ip: "192.168.33.10"
+  config.vm.network "private_network", ip: "192.168.33.10"

   # Create a public network, which generally matched to bridged network.
   # Bridged networks make the machine appear as another physical device on
@@ -49,13 +49,13 @@
   # backing providers for Vagrant. These expose provider-specific options.
   # Example for VirtualBox:
   #
-  # config.vm.provider "virtualbox" do |vb|
-  #   # Display the VirtualBox GUI when booting the machine
-  #   vb.gui = true
-  #
-  #   # Customize the amount of memory on the VM:
-  #   vb.memory = "1024"
-  # end
+  config.vm.provider "virtualbox" do |vb|
+    # Display the VirtualBox GUI when booting the machine
+    vb.gui = true
+
+    # Customize the amount of memory on the VM:
+    vb.memory = "2048"
+  end
   #
   # View the documentation for the provider you are using for more
   # information on available options.
@@ -63,8 +63,18 @@
   # Enable provisioning with a shell script. Additional provisioners such as
   # Puppet, Chef, Ansible, Salt, and Docker are also available. Please see the
   # documentation for more information about their specific syntax and use.
-  # config.vm.provision "shell", inline: <<-SHELL
-  #   apt-get update
-  #   apt-get install -y apache2
-  # SHELL
+  config.vm.provision "shell", inline: <<-SHELL
+    dnf -y update
+
+    dnf config-manager --add-repo=https://download.docker.com/linux/centos/docker-ce.repo
+    dnf -y --nobest install docker-ce
+
+    gpasswd -a vagrant docker
+
+    systemctl start docker
+    systemctl enable docker
+
+    curl -L "https://github.com/docker/compose/releases/download/1.25.3/docker-compose-$(uname -s)-$(uname -m)" -o /usr/local/bin/docker-compose
+    chmod 755 /usr/local/bin/docker-compose
+  SHELL
 end

仮想マシン作成

vagrant up コマンドで仮想マシンを作成します。

D:\vagrant\centos8>vagrant up

仮想マシンへログイン

仮想マシン起動後、vagrant ssh コマンドでログインできます。

D:\vagrant\centos8>vagrant ssh

exit でログアウトします。

[vagrant@centos8 ~]$ exit
logout
Connection to 127.0.0.1 closed.

仮想マシンの停止

vagrant halt仮想マシンを停止します。

D:\vagrant\centos8>vagrant halt

Docker の動作確認

プロビジョニングが正常に実行されていれば docker コマンドが使用可能になっています。

[vagrant@centos8 ~]$ docker -v
Docker version 19.03.5, build 633a0ea

[vagrant@centos8 ~]$ docker-compose -v
docker-compose version 1.25.3, build d4d1b42b

[vagrant@centos8 ~]$ docker pull busybox
Using default tag: latest
latest: Pulling from library/busybox
bdbbaa22dec6: Pull complete
Digest: sha256:6915be4043561d64e0ab0f8f098dc2ac48e077fe23f488ac24b665166898115a
Status: Downloaded newer image for busybox:latest
docker.io/library/busybox:latest

[vagrant@centos8 ~]$ docker images
REPOSITORY          TAG                 IMAGE ID            CREATED             SIZE
busybox             latest              6d5fcfe5ff17        5 weeks ago         1.22MB

[vagrant@centos8 ~]$ docker run --rm busybox echo Hello,World
Hello,World

参考サイト

takaya030.hatenablog.com sig9.hatenablog.com qiita.com

Vagrant で作成したVMにIPアドレスを割り当てる

Vagrant で作成したVMIPアドレスを割り当ててホストOSからアクセスしたときの手順メモ

検証環境

Windows10 Home Edition
VirtualBox 6.0.10
Vagrant 2.2.5

Vagrantfile に設定追加

Vagrantfile に下記を追加します。( ip の値は任意)

  config.vm.network "private_network", ip: "192.168.33.10"

動作確認

vagrant upVM起動後、 192.168.33.10ssh でログイン可能か確認します。

D:\vagrant\centos7>vagrant up

D:\vagrant\centos7>ssh -i D:\vagrant\centos7\.vagrant\machines\default\virtualbox\private_key vagrant@192.168.33.10

トラブルシューティング

Vagrantfile に設定追加後、 vagrant upVM が起動しない

vagrant up のときに下記のようなエラーが発生して VM が起動しない場合があります。

Stderr: VBoxManage.exe: error: Failed to open/create the internal network 'HostInterfaceNetworking-VirtualBox Host-Only Ethernet Adapter #3' (VERR_INTNET_FLT_IF_NOT_FOUND)

本来ならホンストオンリーアダプターが有効になるべきところ、実行権限などの理由で有効にならないことが原因です。

解決方法

VirtualBox マネージャーから 設定 > ネットワーク を選択し、ホストオンリーアダプターの ネットワークアダプター有効化 のチェックをオンにします。
(自分の環境ではこれで正常に動作しました)

f:id:takaya030:20190922182425p:plain

参考サイト

www.vagrantup.com

qiita.com

qiita.com

Vagrant で CentOS7 環境を構築

VagrantVirtualBox に CentOS7 の VM を構築したときの手順メモ

検証環境

Windows10 Home Edition
VirtualBox 6.0.10
Vagrant 2.2.5

VirtualBox のインストール

こちらのサイトからパッケージををダウンロード、インストールします。 www.virtualbox.org

Vagrant のインストール

こちらのサイトからパッケージををダウンロード、インストールします。 www.vagrantup.com

動作確認

C:\>vagrant -v
Vagrant 2.2.5

環境変数 VAGRANT_HOME の設定

Vagrant はデフォルトで Box ファイルを C:\Users 以下に保存しますが、Cドライブの容量が少ない場合は移動させる必要があります。
Box ファイルの保存先は環境変数 VAGRANT_HOME で指定します。

f:id:takaya030:20190915183758p:plain

VirtualBox仮想マシンフォルダ変更

Box ファイル同様、Cドライブの容量が少ない場合は移動させる必要があります。
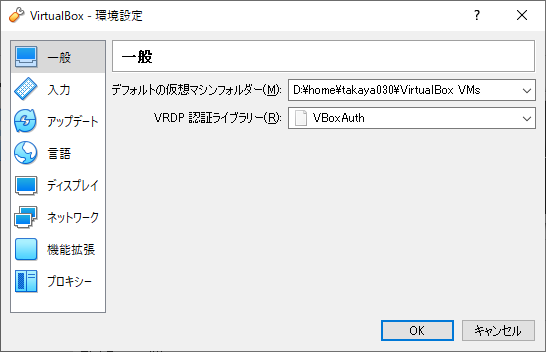
フォルダのパス変更は VirtualBox マネージャーの ファイル > 環境設定 をクリックして デフォルトの仮想マシンフォルダー の項目で設定します。

f:id:takaya030:20190916122322p:plain

Vagrant Box ファイル追加

vagrant box add コマンドで CentOS7 の Box ファイルを追加します。
provider は 3) virtualbox を選択します。

C:\>vagrant box add centos/7
==> box: Loading metadata for box 'centos/7'
    box: URL: https://vagrantcloud.com/centos/7
This box can work with multiple providers! The providers that it
can work with are listed below. Please review the list and choose
the provider you will be working with.

1) hyperv
2) libvirt
3) virtualbox
4) vmware_desktop

Enter your choice: 3

vagrant box list コマンドで Box ファイルが追加されているか確認可能です。

C:\>vagrant box list
centos/7 (virtualbox, 1905.1)

仮想マシン作成

作業用ディレクトリを作成して vagant init を実行します。

D:\>mkdir vagrant\centos7

D:\>cd vagrant\centos7

D:\vagrant\centos7>vagrant init centos/7

作成された Vagrantfile を下記の内容に変更します。
仮想マシンのメモリを 2014MB にしています。

--- a/Vagrantfile     Mon Sep 16 18:18:43 2019
+++ b/Vagrantfile     Mon Sep 16 18:35:57 2019
@@ -49,13 +49,13 @@
   # backing providers for Vagrant. These expose provider-specific options.
   # Example for VirtualBox:
   #
-  # config.vm.provider "virtualbox" do |vb|
-  #   # Display the VirtualBox GUI when booting the machine
-  #   vb.gui = true
-  #
-  #   # Customize the amount of memory on the VM:
-  #   vb.memory = "1024"
-  # end
+  config.vm.provider "virtualbox" do |vb|
+    # Display the VirtualBox GUI when booting the machine
+    vb.gui = true
+
+    # Customize the amount of memory on the VM:
+    vb.memory = "2048"
+  end
   #
   # View the documentation for the provider you are using for more
   # information on available options.

vagrant up コマンドで仮想マシンを作成します。

D:\vagrant\centos7>vagrant up

仮想マシンへログイン

仮想マシン起動後、vagrant ssh コマンドでログインできます。

D:\vagrant\centos7>vagrant ssh

exit でログアウトします。

[vagrant@localhost ~]$ exit
logout
Connection to 127.0.0.1 closed.

仮想マシンの停止

vagrant halt仮想マシンを停止します。

D:\vagrant\centos7>vagrant halt

参考サイト

memories.zal.jp qiita.com qiita.com

Docker で Node.js + Express の開発環境を作成する

VirtualBox + Docker 環境で Node.js + Express を動作させたときの手順メモ

検証環境

Windows10 Home Edition
VirtualBox 5.2.22
Docker version 18.05.0-ce, build f150324
docker-machine version 0.14.0, build 89b8332
docker-compose version 1.20.1, build 5d8c71b

パッケージインストールのためのイメージ作成

VirtualBox の共有フォルダ内にパッケージをインストールしようとすると、シンボリックリンクが作成できずエラーになるため Docker イメージ内にインストールする

node.Dockerfile

FROM node:8-alpine
MAINTAINER takaya030

ENV HOME=/home/node

RUN mkdir $HOME/app
RUN chown -R node:node $HOME/*

USER node
WORKDIR $HOME/app

RUN yarn add express && \
    yarn add @types/express \
        typescript ts-loader tslint tslint-loader tslint-config-airbnb \
        webpack webpack-cli \
        webpack-node-externals \
        --dev

docker-compose.yml

version: "3"
services:
  node:
    build:
      context: .
      dockerfile: ./node.Dockerfile
    image: takaya030/node:8-alpine

イメージのビルド

$ docker-compose build node

作成したイメージから package.jsonyarn.lock を抽出

イメージからコンテナを作成し、 docker cp でホストOS側にコピーする

$ docker run --name temp-node takaya030/node:8-alpine /bin/true
$ docker cp temp-node:/home/node/app/package.json ./package.json
$ docker cp temp-node:/home/node/app/yarn.lock ./yarn.lock

node.Dockerfile の変更

インストールされるパッケージのバージョンを固定するため node.Dockerfile を変更する

--- a/node.Dockerfile   Sun Feb 10 18:26:36 2019
+++ b/node.Dockerfile   Sun Feb 10 19:20:49 2019
@@ -4,14 +4,10 @@
 ENV HOME=/home/node

 RUN mkdir $HOME/app
+COPY package.json yarn.lock $HOME/app/
 RUN chown -R node:node $HOME/*

 USER node
 WORKDIR $HOME/app

-RUN yarn add express && \
-       yarn add @types/express \
-               typescript ts-loader tslint tslint-loader tslint-config-airbnb \
-               webpack webpack-cli \
-               webpack-node-externals \
-               --dev
+RUN yarn install
+
+ENV PATH=$PATH:./node_modules/.bin

変更後の node.Dockerfile でイメージビルドできるか確認

$ docker-compose build node

各種設定ファイル

以下の各ファイルはこちらのサイトから引用させて頂きました qiita.com

webpack.config.dev.js

const path = require('path');
const nodeExternals = require('webpack-node-externals');

module.exports = {
    mode: 'development',
    entry: './src/server.ts',     // src下に書いていくので src/server.tsにしとく
    target: 'node',               // Module not found: Error: Can't resolve 'fs'とかいっぱい出たら、この行書き忘れ
    externals: [nodeExternals()], 
    devtool: 'inline-source-map',
    module: {
        rules: [
            {
                enforce: 'pre',
                loader: 'tslint-loader',
                test: /\.ts$/,
                exclude: [
                    /node_modules/
                ],
                options: {
                    emitErrors: true
                }
            },
            {
                loader: 'ts-loader',
                test: /\.ts$/,
                exclude: [
                    /node_modules/
                ],
                options: {
                    configFile: 'tsconfig.dev.json'
                }
            }
        ]
    },
    resolve: {
        extensions: [ '.ts', '.js' ]
    },
    output: {
        filename: 'server.js',
        path: path.resolve(__dirname, 'dist')
    }
};

webpack.config.prod.js

const path = require('path');
const nodeExternals = require('webpack-node-externals');

module.exports = {
    mode: 'production',
    entry: './src/server.ts',     // src下に書いていくので src/server.tsにしとく
    target: 'node',               // Module not found: Error: Can't resolve 'fs'とかいっぱい出たら、この行書き忘れ
    externals: [nodeExternals()], 
    module: {
        rules: [
            {
                enforce: 'pre',
                loader: 'tslint-loader',
                test: /\.ts$/,
                exclude: [
                    /node_modules/
                ],
                options: {
                    emitErrors: true
                }
            },
            {
                loader: 'ts-loader',
                test: /\.ts$/,
                exclude: [
                    /node_modules/
                ],
                options: {
                    configFile: 'tsconfig.dev.json'
                }
            }
        ]
    },
    resolve: {
        extensions: [ '.ts', '.js' ]
    },
    output: {
        filename: 'server.js',
        path: path.resolve(__dirname, 'dist')
    }
};

tsconfig.dev.json

{
  "compilerOptions": {
    "sourceMap": true,
    "noImplicitAny": true,
    "module": "es6",
    "target": "es5",
    "jsx": "react",
    "lib": ["es2018", "dom"],
    "moduleResolution": "node",
    "removeComments": true,
    "strict": true,
    "noUnusedLocals": true,
    "noUnusedParameters": false,
    "noImplicitReturns": true,
    "noFallthroughCasesInSwitch": true,
    "strictFunctionTypes": false
  }
}

tsconfig.prod.json

{
  "compilerOptions": {
    "noImplicitAny": true,
    "module": "es6",
    "target": "es5",
    "jsx": "react",
    "lib": ["es2018", "dom"],
    "moduleResolution": "node",
    "removeComments": true,
    "strict": true,
    "noUnusedLocals": true,
    "noUnusedParameters": false,
    "noImplicitReturns": true,
    "noFallthroughCasesInSwitch": true,
    "strictFunctionTypes": false
  }
}

tslint.json

{
    "extends": "tslint-config-airbnb",
    "rules": {
        "ter-indent": [true, 4]
    }
}

src/server.ts

こちらはサンプルのソースコードになります

import * as Express from 'express';

const app = Express();

app.get(
    '/',
    (req: Express.Request, res: Express.Response) => {
        return res.send('Hello world.');
    });

app.listen(
    3000,
    () => {
        console.log('Example app listening on port 3000!');
    });

export default app;

ビルドと実行

docker-compose.yml の変更

ビルドと実行のための設定を追加します

--- a/docker-compose.yml        Mon Feb 11 11:43:19 2019
+++ b/docker-compose.yml        Sun Feb 10 23:14:41 2019
@@ -5,3 +5,9 @@
       context: .
       dockerfile: ./node.Dockerfile
     image: takaya030/node:8-alpine
+    volumes:
+      - .:/home/node/app
+      - /home/node/app/node_modules
+    ports:
+      - "3000:3000"
+    command: node dist/server.js

ビルド

$ docker-compose run --rm node webpack --config webpack.config.dev.js

実行

$ docker-compose up -d

web ブラウザで http://192.168.99.100:3000 を開いて "Hello World." が表示されれば成功です

参考サイト

postd.cc

Docker で古い Laravel の開発環境を作成する

4年前に Laravel4.2 で作った Web アプリケーションの開発環境を Docker で作り直したときの手順メモ

検証環境

Windows10 Home Edition
VirtualBox 5.2.22
Docker version 18.05.0-ce, build f150324
docker-machine version 0.14.0, build 89b8332
docker-compose version 1.20.1, build 5d8c71b

Laravel4.2 の環境について

4年前に作成したときは以下の構成でした
当時は DockerVagrant は使用しておらず、VirtualBox に直接 CentOS をインストールして構築していました

CentOS 6.5
PHP 5.5.16
Laravel 4.2.16
MySQL 5.6.26
memcached 1.4.18

今回以下の内容で Docker 上に再構築します

CentOS 6.10
PHP 5.5.38
Laravel 4.2.22
MySQL 5.6.42
memcached 1.5

各種設定ファイル

GitHub のこちらのリポジトリにアップしてあります github.com

イメージのビルド

$ git clone https://github.com/takaya030/docker-centos6-lamp.git la42
$ cd la42
$ docker-compose build base
$ docker-compose build

コンテナの起動

$ docker-compose up -d

動作確認

web ブラウザで http://192.168.99.100 を開いて以下の画面が表示されれば正常に動作しています

f:id:takaya030:20190101225818p:plain

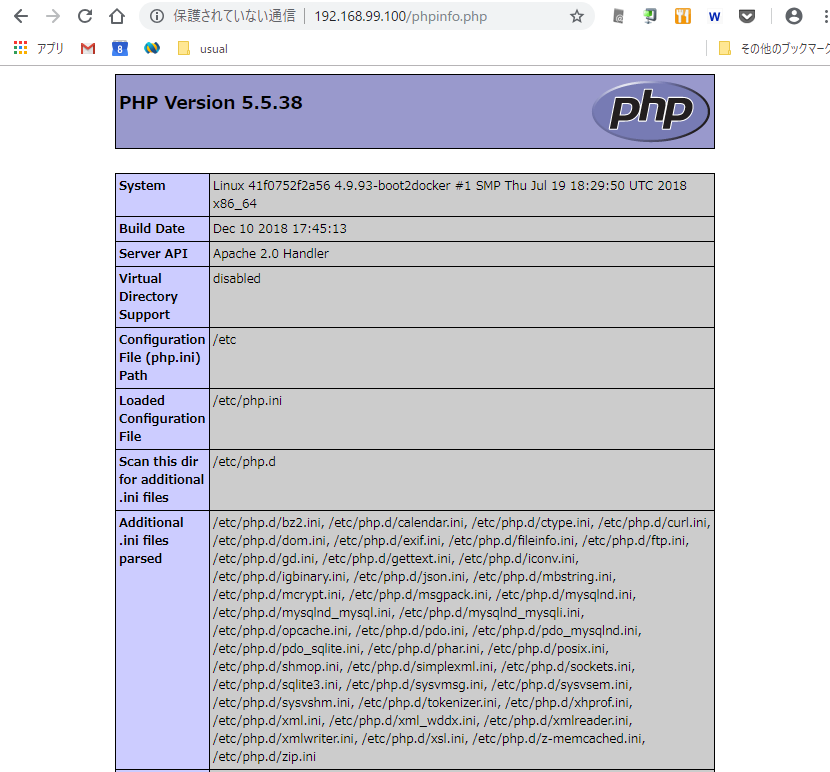
http://192.168.99.100/phpinfo.php にアクセスすると phpinfo が表示されます

f:id:takaya030:20190101225858p:plain

Laravel 4.2 のインストール

一旦コンテナを停止します

$ docker-compose stop

docker-compose.yml と同じ位置に webapp フォルダを作成します

$ mkdir webapp

docker-compose.yml を以下の通りに変更します

--- a/docker-compose.yml  Tue Jan 01 16:58:55 2019
+++ b/docker-compose.yml  Tue Jan 01 17:28:15 2019
@@ -4,7 +4,7 @@
     build: ./base
     image: takaya030/php:5.5
     volumes:
-      - ./itworks:/webapp
+      - ./webapp:/webapp
   web:
     build: ./web
     image: takaya030/web:5.5

コンテナを再起動します

$ docker-compose up -d

ssh を使って、ユーザー名: docker , パスワード: tcuser , ポート番号: 2022manage コンテナにログインします

$ ssh -p 2022 docker@192.168.99.100

composerLaravel をインストールします

$ composer create-project laravel/laravel /webapp v4.2.11

動作確認

web ブラウザで http://192.168.99.100 を開いて Laravel の Welcome ページが表示されるか確認します

f:id:takaya030:20190101230342p:plain

Laravelの設定

環境設定

/webapp/bootstrap/start.php を下記の通りに変更します

--- a/webapp/bootstrap/start.php       2019-01-02 11:21:29.136767400 +0900
+++ b/webapp/bootstrap/start.php       2019-01-03 12:27:58.733542500 +0900
@@ -26,7 +26,7 @@

 $env = $app->detectEnvironment(array(

-       'local' => array('homestead'),
+       'local' => array('dev-manage','dev-web'),

 ));

データベースの設定

/webapp/app/config/local/database.php を下記の通りに変更します

--- a/webapp/app/config/local/database.php     2018-12-31 16:40:43.421769900 +0900
+++ b/webapp/app/config/local/database.php     2019-01-03 12:40:17.927538800 +0900
@@ -22,24 +22,13 @@

                'mysql' => array(
                        'driver'    => 'mysql',
-                       'host'      => 'localhost',
-                       'database'  => 'homestead',
-                       'username'  => 'homestead',
-                       'password'  => 'secret',
+                       'host'      => 'mysql',
+                       'database'  => 'master',
+                       'username'  => 'dbuser',
+                       'password'  => 'dbuser',
                        'charset'   => 'utf8',
                        'collation' => 'utf8_unicode_ci',
                        'prefix'    => '',
-               ),
-
-               'pgsql' => array(
-                       'driver'   => 'pgsql',
-                       'host'     => 'localhost',
-                       'database' => 'homestead',
-                       'username' => 'homestead',
-                       'password' => 'secret',
-                       'charset'  => 'utf8',
-                       'prefix'   => '',
-                       'schema'   => 'public',
                ),

        ),

キャッシュの設定

以下の内容で /webapp/app/config/local/cache.php を作成します

<?php

return array(

    /*
   |--------------------------------------------------------------------------
   | Default Cache Driver
   |--------------------------------------------------------------------------
   |
   | This option controls the default cache "driver" that will be used when
   | using the Caching library. Of course, you may use other drivers any
   | time you wish. This is the default when another is not specified.
   |
   | Supported: "file", "database", "apc", "memcached", "redis", "array"
   |
   */

    'driver' => 'memcached',

    /*
   |--------------------------------------------------------------------------
   | Memcached Servers
   |--------------------------------------------------------------------------
   |
   | Now you may specify an array of your Memcached servers that should be
   | used when utilizing the Memcached cache driver. All of the servers
   | should contain a value for "host", "port", and "weight" options.
   |
   */

    'memcached' => array(

        array('host' => 'memcached', 'port' => 11211, 'weight' => 100),

    ),

);

セッションの設定

以下の内容で /webapp/app/config/local/session.php を作成します

<?php

return array(

    /*
   |--------------------------------------------------------------------------
   | Default Session Driver
   |--------------------------------------------------------------------------
   |
   | This option controls the default session "driver" that will be used on
   | requests. By default, we will use the lightweight native driver but
   | you may specify any of the other wonderful drivers provided here.
   |
   | Supported: "file", "cookie", "database", "apc",
   |            "memcached", "redis", "array"
   |
   */

    'driver' => 'memcached',

);

動作確認

manage コンテナにログインして以下の artisan コマンドが動作するか確認します

$ php artisan cache:clear
Application cache cleared!

$ php artisan migrate:install
Migration table created successfully.

phpMyAdmin について

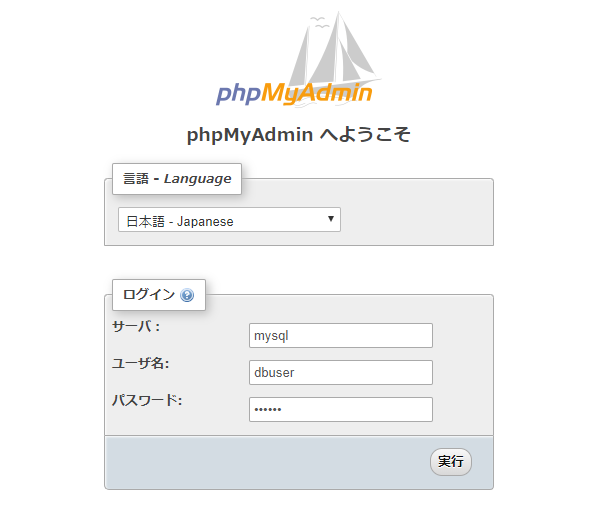
web ブラウザで http://192.168.99.100:8080 にアクセスすると phpMyAdmin のログイン画面が表示されます
サーバ: mysql , ユーザ名: dbuser , パスワード: dbuser でログイン可能です

f:id:takaya030:20190103180856p:plain

Windows + VirtualBox に構築した minikube のホストVMのストレージを移動する

Windows + VirtualBoxminikubeKubernetes クラスタを作成した場合、仮想ディスクファイル disk.vmdk は C: ドライブに作られます
自分の環境では C: ドライブの空き容量が少ないため、 disk.vmdk を D: ドライブに移動させてみました

検証環境

Windows10 Home Edition
VirtualBox 5.2.16
minikube version: v0.30.0

Kubernetes クラスタの停止

Kubernetes クラスタが停止しているか確認します

C:\>minikube status
minikube: Running
cluster: Running
kubectl: Correctly Configured: pointing to minikube-vm at 192.168.99.100

起動中の場合は下記のコマンドで停止します

C:\>minikube stop

disk.vmdk の移動

disk.vmdk は通常 C:\Users\<ユーザー名>\.minikube\machines\minikube\ に作られます
今回はそれを D: ドライブに移動します

D:\>mkdir D:\minikube\machines\minikube
D:\>copy C:\Users\takaya030\.minikube\machines\minikube\disk.vmdk D:\minikube\machines\minikube

.vbox ファイルの編集

C:\Users\<ユーザー名>\.minikube\machines\minikube\minikube\minikube.vbox で設定されている disk.vmdk ファイルのパスを変更します

--- minikube.vbox.orig  2018-10-27 18:00:04.040947200 +0900
+++ minikube.vbox       2018-10-27 18:59:28.318609900 +0900
@@ -9,7 +9,7 @@
   <Machine uuid="{e1ded2f8-93e5-4dd0-b5b0-ca75477afc5b}" name="minikube" OSType="Linux26_64" snapshotFolder="Snapshots" lastStateChange="2018-10-27T09:00:04Z">
     <MediaRegistry>
       <HardDisks>
-        <HardDisk uuid="{eb3d5ff2-a1ed-40e9-9835-c15ecd031216}" location="C:/Users/takaya030/.minikube/machines/minikube/disk.vmdk" format="VMDK" type="Normal"/>
+        <HardDisk uuid="{eb3d5ff2-a1ed-40e9-9835-c15ecd031216}" location="D:/minikube/machines/minikube/disk.vmdk" format="VMDK" type="Normal"/>
       </HardDisks>
       <DVDImages>
         <Image uuid="{88d3ec5f-1bfe-4ab3-afd3-085df99077cc}" location="C:/Users/Minoru/.minikube/machines/minikube/boot2docker.iso"/>

Kubernetes クラスタの起動

C:\>minikube start

参考サイト

takaya030.hatenablog.com