takaya030の備忘録

PHP、Laravel、Docker などの話がメインです

MinGW + SDL2 で OpenGL を使う

検証環境

Windows10 Home Edition
SDL 2.0.7

$ gcc --version
gcc.exe (rubenvb-4.5.4) 4.5.4
Copyright (C) 2010 Free Software Foundation, Inc.
This is free software; see the source for copying conditions.  There is NO
warranty; not even for MERCHANTABILITY or FITNESS FOR A PARTICULAR PURPOSE.

MinGW 環境に SDL2 をインストールする

こちらの手順でインストールする
takaya030.hatenablog.com

サンプルコード

同じディレクトリ内に以下の 2 ファイルを作成する

sdl2_sample.cpp

#include <GL/gl.h>
#include <GL/glu.h>
#include <SDL.h>
#include <iostream>

#define SDL_WINDOW_TITLE "SDL2"
#define SDL_WINDOW_WIDTH (640)
#define SDL_WINDOW_HEIGHT (480)

#define SDL_PrintError(name)                                    \
  do {                                                          \
    std::cerr << #name << ": " << SDL_GetError() << std::endl;  \
  } while (0)

static SDL_Window *gWindow;
static SDL_GLContext context;


static bool initialize()
{
  if (SDL_Init(SDL_INIT_EVERYTHING) < 0) {
    SDL_PrintError(SDL_Init);
    return false;
  }

  gWindow = SDL_CreateWindow(SDL_WINDOW_TITLE, SDL_WINDOWPOS_UNDEFINED, SDL_WINDOWPOS_UNDEFINED,
		  SDL_WINDOW_WIDTH, SDL_WINDOW_HEIGHT,
		  SDL_WINDOW_OPENGL|SDL_WINDOW_RESIZABLE);
  if (gWindow == NULL) {
    SDL_PrintError(SDL_CreateWindow);
    goto err1;
  }

  // create OpenGL Context
  context = SDL_GL_CreateContext(gWindow);
  if ( !context ) {
      SDL_PrintError(SDL_GL_CreateContext);
	  goto err2;
  }

  return true;

 err2:
  SDL_DestroyWindow(gWindow);
 err1:
  SDL_Quit();
  return false;
}

static bool initGL()
{

    /* Enable smooth shading */
    glShadeModel( GL_SMOOTH );

    /* Set the background black */
    glClearColor( 0.0f, 0.0f, 0.0f, 0.0f );

    /* Depth buffer setup */
    glClearDepth( 1.0f );

    /* Enables Depth Testing */
    glEnable( GL_DEPTH_TEST );

    /* The Type Of Depth Test To Do */
    glDepthFunc( GL_LEQUAL );

    /* Really Nice Perspective Calculations */
    glHint( GL_PERSPECTIVE_CORRECTION_HINT, GL_NICEST );

    return( TRUE );
}

static bool resizeWindow( int width, int height )
{
    /* Height / width ration */
    GLfloat ratio;

    /* Protect against a divide by zero */
    if ( height == 0 )
	height = 1;

    ratio = ( GLfloat )width / ( GLfloat )height;

    /* Setup our viewport. */
    glViewport( 0, 0, ( GLsizei )width, ( GLsizei )height );

    /* change to the projection matrix and set our viewing volume. */
    glMatrixMode( GL_PROJECTION );
    glLoadIdentity( );

    /* Set our perspective */
    gluPerspective( 45.0f, ratio, 0.1f, 100.0f );

    /* Make sure we're chaning the model view and not the projection */
    glMatrixMode( GL_MODELVIEW );

    /* Reset The View */
    glLoadIdentity( );

    return( true );
}

static void finalize()
{
  SDL_GL_DeleteContext(context);
  SDL_DestroyWindow(gWindow);
  SDL_Quit();
}

static void render()
{
  /* Clear The Screen And The Depth Buffer */
  glClear( GL_COLOR_BUFFER_BIT | GL_DEPTH_BUFFER_BIT );

    /* Move Left 1.5 Units And Into The Screen 6.0 */
    glLoadIdentity();
    glTranslatef( -1.5f, 0.0f, -6.0f );

    glBegin( GL_TRIANGLES );             /* Drawing Using Triangles       */
      glColor3f(   1.0f,  0.0f,  0.0f ); /* Red                           */
      glVertex3f(  0.0f,  1.0f,  0.0f ); /* Top Of Triangle               */
      glColor3f(   0.0f,  1.0f,  0.0f ); /* Green                         */
      glVertex3f( -1.0f, -1.0f,  0.0f ); /* Left Of Triangle              */
      glColor3f(   0.0f,  0.0f,  1.0f ); /* Blue                          */
      glVertex3f(  1.0f, -1.0f,  0.0f ); /* Right Of Triangle             */
    glEnd( );                            /* Finished Drawing The Triangle */

    /* Move Right 3 Units */
    glTranslatef( 3.0f, 0.0f, 0.0f );

    /* Set The Color To Blue One Time Only */
    glColor3f( 0.5f, 0.5f, 1.0f);

    glBegin( GL_QUADS );                 /* Draw A Quad              */
      glVertex3f(  1.0f,  1.0f,  0.0f ); /* Top Right Of The Quad    */
      glVertex3f( -1.0f,  1.0f,  0.0f ); /* Top Left Of The Quad     */
      glVertex3f( -1.0f, -1.0f,  0.0f ); /* Bottom Left Of The Quad  */
      glVertex3f(  1.0f, -1.0f,  0.0f ); /* Bottom Right Of The Quad */
    glEnd( );                            /* Done Drawing The Quad    */

  /* Draw it to the screen */
  SDL_GL_SwapWindow(gWindow);

  /** NOTE: Sleep 10 msec. */
  SDL_Delay(10);
}

static bool input()
{
  SDL_Event event;

  /** NOTE: SDL_PollEvent does not sleep while SDL_WaitEvent sleep
      till event comes. SDL_WaitEvent is more relaxible than
      SDL_PollEvent. If input is combined with rendering,
      SDL_WaitEvent cannot be used. */
  while (SDL_PollEvent(&event)) {
    switch (event.type) {
    case SDL_QUIT:
      return true;
      break;
    case SDL_WINDOWEVENT:
      switch( event.window.event ) {
        case SDL_WINDOWEVENT_RESIZED:
	    /* handle resize event */
	    SDL_SetWindowSize( gWindow, event.window.data1, event.window.data2 );
	    resizeWindow( event.window.data1, event.window.data2 );
	    break;
      }
      break;
    default:
      break;
    }
  }

  return false;
}

int main(int argc, char *argv[])
{
  if (!initialize())
    return 1;

  initGL();
  resizeWindow( SDL_WINDOW_WIDTH, SDL_WINDOW_HEIGHT );

  while (1) {
    if (input())
      break;
    render();
  }

  finalize();
  return 0;
}

Makefile

TARGETS = sdl2_sample

all: $(TARGETS)

SDL_PREFIX	= /usr
SDL_CONFIG	= $(SDL_PREFIX)/bin/sdl2-config
CG_LIBS		= 

# 各自の環境に合わせて gcc, g++ のパスを設定する
CROSS_COMPILE	= /usr/local/bin
CC		= $(CROSS_COMPILE)gcc
CXX		= $(CROSS_COMPILE)g++

CFLAGS 		= -g -Wall `/bin/sh $(SDL_CONFIG) --cflags`
CXXFLAGS	= -g -Wall `/bin/sh $(SDL_CONFIG) --cflags`
LDFLAGS		= `/bin/sh $(SDL_CONFIG) --libs`	-Wl,-rpath,$(SDL_PREFIX)/lib
LIBS		= -lopengl32 -lglu32 -lm

clean:
	rm -f *.o *.a *~ $(TARGETS)

sdl2_sample: sdl2_sample.o
	$(CXX) -o $@ $^ $(LDFLAGS) $(LIBS)

ビルド

$ make

実行

$ ./sdl2_sample.exe

このようなウィンドウが表示されれば成功です
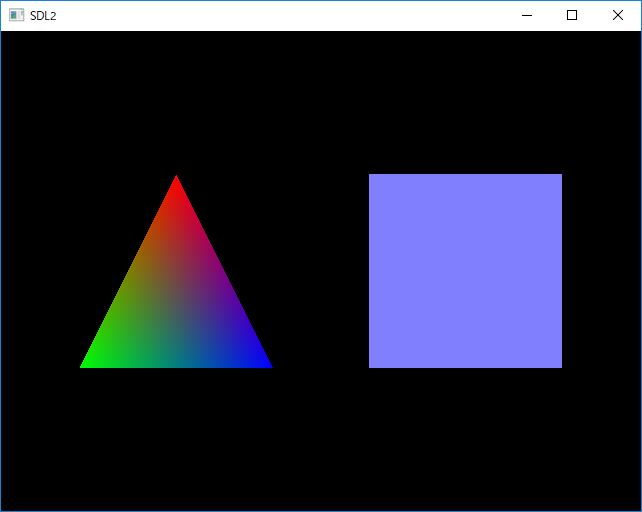
f:id:takaya030:20180109225315p:plain

MinGW 環境に SDL2 をインストールする

検証環境

Windows10 Home Edition

$ gcc --version
gcc.exe (rubenvb-4.5.4) 4.5.4
Copyright (C) 2010 Free Software Foundation, Inc.
This is free software; see the source for copying conditions.  There is NO
warranty; not even for MERCHANTABILITY or FITNESS FOR A PARTICULAR PURPOSE.

コンパイラの target processor 確認

コンパイラが 32bit/64bit どちらの CPU に対応しているか確認する

$ gcc -dumpmachine
x86_64-w64-mingw32

SDL2 のダウンロード

下記サイトのダウンロードページから SDL2-devel-2.0.7-mingw.tar.gz をダウンロードする
Simple DirectMedia Layer - Homepage

下記コマンドで解凍する

$ gzip -dc SDL2-devel-2.0.7-mingw.tar.gz | tar xvf -

SDL2 のインストール

arch は先ほど確認した target processor を指定する

$ cd SDL2-2.0.7
$ make install-package arch=x86_64-w64-mingw32 prefix=/usr

Windows版 python で pip の upgrade に失敗する

検証環境

Windows10 Home Edition
Python 2.7.6

発生したトラブルについて

C:\>pip list
  .
  .
pip (8.1.1)
  .
  .
You are using pip version 8.1.1, however version 9.0.1 is available.
You should consider upgrading via the 'python -m pip install --upgrade pip' command.

上記の指示通り upgrade したらエラーが発生

C:\>python -m pip install --upgrade pip
C:\bin\Python27\lib\site-packages\pip-8.1.1-py2.7.egg\pip\_vendor\requests\packages\urllib3\util\ssl_.py:315: SNIMissingWarning: An HTTPS request has been made, but the SNI (Subject Name Indication) extension to TLS is not available on this platform. This may cause the server to present an incorrect TLS certificate, which can cause validation failures. For more information, see https://urllib3.readthedocs.org/en/latest/security.html#snimissingwarning.
  SNIMissingWarning
C:\bin\Python27\lib\site-packages\pip-8.1.1-py2.7.egg\pip\_vendor\requests\packages\urllib3\util\ssl_.py:120: InsecurePlatformWarning: A true SSLContext object is not available. This prevents urllib3 from configuring SSL appropriately and may cause certain SSL connections to fail. For more information, see https://urllib3.readthedocs.org/en/latest/security.html#insecureplatformwarning.
  InsecurePlatformWarning
Collecting pip
  Downloading pip-9.0.1-py2.py3-none-any.whl (1.3MB)
    100% |################################| 1.3MB 764kB/s
Installing collected packages: pip
  Found existing installation: pip 8.1.1
    Uninstalling pip-8.1.1:
      Successfully uninstalled pip-8.1.1
  Rolling back uninstall of pip
Exception:
Traceback (most recent call last):
  File "C:\bin\Python27\lib\site-packages\pip-8.1.1-py2.7.egg\pip\basecommand.py", line 209, in main
    status = self.run(options, args)
  File "C:\bin\Python27\lib\site-packages\pip-8.1.1-py2.7.egg\pip\commands\install.py", line 317, in run
    prefix=options.prefix_path,
  File "C:\bin\Python27\lib\site-packages\pip-8.1.1-py2.7.egg\pip\req\req_set.py", line 732, in install
    **kwargs
  File "C:\bin\Python27\lib\site-packages\pip-8.1.1-py2.7.egg\pip\req\req_install.py", line 835, in install
    self.move_wheel_files(self.source_dir, root=root, prefix=prefix)
  File "C:\bin\Python27\lib\site-packages\pip-8.1.1-py2.7.egg\pip\req\req_install.py", line 1030, in move_wheel_files
    isolated=self.isolated,
  File "C:\bin\Python27\lib\site-packages\pip-8.1.1-py2.7.egg\pip\wheel.py", line 461, in move_wheel_files
    generated.extend(maker.make(spec))
  File "C:\bin\Python27\lib\site-packages\pip-8.1.1-py2.7.egg\pip\_vendor\distlib\scripts.py", line 372, in make
    self._make_script(entry, filenames, options=options)
  File "C:\bin\Python27\lib\site-packages\pip-8.1.1-py2.7.egg\pip\_vendor\distlib\scripts.py", line 276, in _make_script
    self._write_script(scriptnames, shebang, script, filenames, ext)
  File "C:\bin\Python27\lib\site-packages\pip-8.1.1-py2.7.egg\pip\_vendor\distlib\scripts.py", line 212, in _write_script
    launcher = self._get_launcher('t')
  File "C:\bin\Python27\lib\site-packages\pip-8.1.1-py2.7.egg\pip\_vendor\distlib\scripts.py", line 351, in _get_launcher
    result = finder(distlib_package).find(name).bytes
AttributeError: 'NoneType' object has no attribute 'bytes'
You are using pip version 8.1.1, however version 9.0.1 is available.
You should consider upgrading via the 'python -m pip install --upgrade pip' command.

試しにもう一度コマンド入力してみたらアップグレード済みと出る

C:\>python -m pip install --upgrade pip
Requirement already up-to-date: pip in c:\bin\python27\lib\site-packages

しかし "pip list" で確認するとアップグレードに失敗している模様

C:\>pip list
  .
  .
pip (8.1.1)
  .
  .
You are using pip version 8.1.1, however version 9.0.1 is available.
You should consider upgrading via the 'python -m pip install --upgrade pip' command.

解決方法

"--force-reinstall" オプションをつけて再度アップグレードしたら直りました

C:\>python -m pip install --force-reinstall --upgrade pip
Collecting pip
  Using cached pip-9.0.1-py2.py3-none-any.whl
Installing collected packages: pip
  Found existing installation: pip 9.0.1
    Uninstalling pip-9.0.1:
      Successfully uninstalled pip-9.0.1
Successfully installed pip-9.0.1

C:\>pip list
DEPRECATION: The default format will switch to columns in the future. You can use --format=(legacy|columns) (or define a format=(legacy|columns) in your pip.conf under the [list] section) to disable this warning.
  .
  .
pip (9.0.1)
  .
  .

Windows + VirtualBox + docker-machine 環境のアップデート

Windows 上に構築した Docker 環境のアップデート手順のメモ

検証環境

Windows10 Home Edition
VirtualBox 5.1.22
Git for Windows 2.9.3
Docker version 17.05.0-ce, build 89658be
docker-machine version 0.6.0, build e27fb87

アップデートの方針

Docker Toolbox を使用すれば VirtualBox、msysgit も同時にインストールされますが、必ずしも最新版がインストールされるとは限らないため、個別にインストールする

VirtualBox のアップデート

こちらのサイトから最新版インストーラをダウンロードします
上書きインストールで OK です
Oracle VM VirtualBox

Git for Windows (msysgit) のアップデート

こちらのサイトから最新版インストーラをダウンロードします
上書きインストールで OK です
git-for-windows.github.io

Docker Toolbox のアップデート

こちらのサイトから最新版インストーラをダウンロードします
www.docker.com
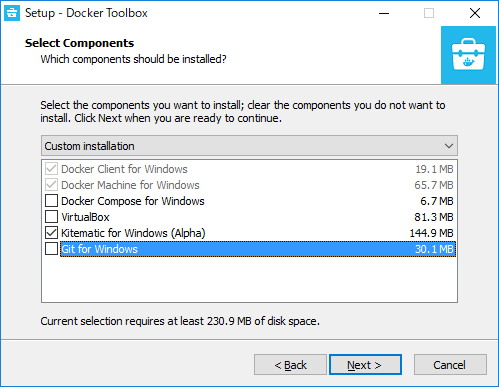
VirtualBox と Git for Windows のチェックは外してインストールします
f:id:takaya030:20171119233839p:plain

Docker ホストのアップデート

必要に応じて Docker ホスト(CoreOS) のアップデートを実行します

$ docker-machine start default
Starting "default"...
(default) Check network to re-create if needed...
(default) Windows might ask for the permission to configure a dhcp server. Sometimes, such confirmation window is minimized in the taskbar.
(default) Waiting for an IP...
Machine "default" was started.
Waiting for SSH to be available...
Detecting the provisioner...
Started machines may have new IP addresses. You may need to re-run the `docker-machine env` command.

$ docker-machine ls
NAME      ACTIVE   DRIVER       STATE     URL                         SWARM   DOCKER        ERRORS
default   -        virtualbox   Running   tcp://192.168.99.100:2376           v17.05.0-ce

$ docker-machine upgrade default
Waiting for SSH to be available...
Detecting the provisioner...
Upgrading docker...
Stopping machine to do the upgrade...
Upgrading machine "default"...
Default Boot2Docker ISO is out-of-date, downloading the latest release...
Latest release for github.com/boot2docker/boot2docker is v17.10.0-ce
Downloading C:\Users\takaya030\.docker\machine\cache\boot2docker.iso from https://github.com/boot2docker/boot2docker/releases/download/v17.10.0-ce/boot2docker.iso...
0%....10%....20%....30%....40%....50%....60%....70%....80%....90%....100%
Copying C:\Users\takaya030\.docker\machine\cache\boot2docker.iso to C:\Users\takaya030\.docker\machine\machines\default\boot2docker.iso...
Starting machine back up...
(default) Check network to re-create if needed...
(default) Windows might ask for the permission to configure a dhcp server. Sometimes, such confirmation window is minimized in the taskbar.
(default) Waiting for an IP...
Restarting docker...

$ docker-machine ls
NAME      ACTIVE   DRIVER       STATE     URL                         SWARM   DOCKER        ERRORS
default   *        virtualbox   Running   tcp://192.168.99.100:2376           v17.10.0-ce

アップデート結果

自分の環境では下記の通りにアップデートされました

VirtualBox 5.1.30

$ git version
git version 2.15.0.windows.1

$ docker -v
Docker version 17.10.0-ce, build f4ffd25

$ docker-machine -v
docker-machine.exe version 0.13.0, build 9ba6da9

参考サイト

takaya030.hatenablog.com

GAE/Go + Echo でセッションを使う

Google App Engine for Go (GAE/Go) で動作している Echo の環境でセッションを使用する手順メモ

検証環境

Windows10 Home Edition
VirtualBox 5.1.22
Docker version 17.05.0-ce, build 89658be
docker-compose version 1.6.2, build 4d72027

GAE/Go, Echo 開発環境について

今回は下記サイトの手順で構築したものを使用します
takaya030.hatenablog.com

session パッケージについて

gorilla/sessions を GAE 対応させた下記パッケージを使用します
github.com

ディレクトリ構成

+---gaego
|   |   docker-compose.yml
|   |   
|   +---config
|   |   
|   +---data
|   |       Dockerfile
|   |   
|   +---glide
|   |       
|   +---sdk
|           Dockerfile
|            
+---logs
|    
+---www
    |       
    +---app
    |       app.yaml
    |       main.go
    |
    +---src
        |
        +---hello
                app.go
                app-engine.go
                app-standalone.go
                glide.yaml
                hello.go

各種ファイルの詳細

www/app/app.yaml

runtime: go
api_version: go1

handlers:
- url: /.*
  script: _go_app

www/app/main.go

package main

import (
	_ "hello"
)

func init() {
}

www/src/hello/app.go

package hello

var e = createMux()

www/src/hello/app-engine.go

// +build appengine

package hello

import (
    "github.com/labstack/echo"
    "github.com/labstack/echo/engine/standard"
    "net/http"
)

func createMux() *echo.Echo {
    e := echo.New()

    // note: we don't need to provide the middleware or static handlers, that's taken care of by the platform
    // app engine has it's own "main" wrapper - we just need to hook echo into the default handler
    s := standard.New("")
    s.SetHandler(e)
    http.Handle("/", s)

    return e
}

// main()は書かなくて良い

www/src/hello/app-standalone.go

// +build !appengine,!appenginevm

package hello

import (
    "github.com/labstack/echo"
    "github.com/labstack/echo/engine/standard"
    "github.com/labstack/echo/middleware"
)

// ログの設定や静的ファイルの場所指定などをしています
func createMux() *echo.Echo {
    e := echo.New()

    e.Use(middleware.Recover())
    e.Use(middleware.Logger())
    e.Use(middleware.Gzip())

    e.Use(middleware.Static("public"))

    return e
}

func main() {
    e.Run(standard.New(":8080"))
}

www/src/hello/glide.yaml

package: hello
import:
- package: github.com/labstack/echo
  version: v2.2.0
  subpackages:
  - engine/standard
  - middleware
- package: github.com/rs/cors
- package: github.com/gorilla/sessions
- package: github.com/gorilla/context
- package: github.com/dsoprea/goappenginesessioncascade
- package: github.com/dsoprea/go-logging

www/src/hello/hello.go

package hello

import (
    "net/http"
    "strconv"

    "github.com/labstack/echo"
    "github.com/labstack/echo/engine/standard"
    "github.com/rs/cors"

    "github.com/dsoprea/goappenginesessioncascade"
)

const (
    sessionName = "MainSession"
)

var (
    sessionSecret = []byte("SessionSecret")
    sessionStore = cascadestore.NewCascadeStore(cascadestore.DistributedBackends, sessionSecret)
)

func init() {

    g := e.Group("/hello")
    g.Use(standard.WrapMiddleware(cors.Default().Handler))

    g.GET("", getWorld)
}


// hello world

func getWorld(c echo.Context) error {

    w := c.Response().(*standard.Response).ResponseWriter
    r := c.Request().(*standard.Request).Request

    var foo int
    if sess, err := sessionStore.Get(r, sessionName); err != nil {
        panic(err)
    } else {

        if val, found := sess.Values["foo"]; found == false {
            foo = 0
        } else {
            foo = val.(int) + 1
        }

        sess.Values["foo"] = foo
        if err := sess.Save(r, w); err != nil {
            panic(err)
        }
    }

    return c.String(http.StatusOK, "Hello, World! foo is " + strconv.Itoa(foo))
}

glide によるパッケージインストール

$ cd gaego
$ docker-compose run --rm sdk /bin/bash -c "cd src/hello;glide up"

動作確認

以下のコマンドで開発用サーバーが起動します

$ docker-compose up -d

web ブラウザで http://192.168.99.100:8080/hello にアクセスして以下のような文字列が表示されれば成功です

Hello, World! foo is 0

"foo is" の数値はセッションに保存されていて、アクセスの度にインクリメントします
ブラウザをリロードすると数値がインクリメントするのが確認できます

Laravel で Tumblr API の Access Token を取得

Laravel で Tumblr API のアクセストークンを取得するプログラムを動かしたときのメモ

検証環境

$ php --version
PHP 7.1.4 (cli) (built: May 11 2017 17:22:31) ( NTS )
Copyright (c) 1997-2017 The PHP Group
Zend Engine v3.1.0, Copyright (c) 1998-2017 Zend Technologies

$ php artisan --version
Laravel Framework 5.4.33

Tumblr API の認証についての注意点

  • 認証プロトコルは OAuth 1.0a
  • Twitter などと違い、開発コンソール画面で Access Token の確認ができないため、Web アプリケーションなどで Access Token が必要な場合は認証プログラムを使って取得する必要がある

OAuth パッケージについて

今回は Laravel5 対応の以下のパッケージを使用します
github.com

oriceon/oauth-5-laravel のインストール

composer.jsonrequire セクションに下記内容を追加

    "require": {
        "oriceon/oauth-5-laravel": "dev-master"
    }

その後 composer update でインストール

$ composer update

config/app.php を下記のように変更してパッケージを登録

--- config/app.php.orig Fri Aug 18 12:25:23 2017
+++ config/app.php      Wed Aug 16 16:55:38 2017
@@ -177,6 +177,11 @@
         App\Providers\EventServiceProvider::class,
         App\Providers\RouteServiceProvider::class,

+        /*
+         * OAuth
+         */
+        Artdarek\OAuth\OAuthServiceProvider::class,
+
     ],

     /*
@@ -212,6 +217,7 @@
         'Log' => Illuminate\Support\Facades\Log::class,
         'Mail' => Illuminate\Support\Facades\Mail::class,
         'Notification' => Illuminate\Support\Facades\Notification::class,
+        'OAuth'     => Artdarek\OAuth\Facade\OAuth::class,
         'Password' => Illuminate\Support\Facades\Password::class,
         'Queue' => Illuminate\Support\Facades\Queue::class,
         'Redirect' => Illuminate\Support\Facades\Redirect::class,

以下の内容で config/oauth-5-laravel.php を作成

<?php

return [

	/*
	|--------------------------------------------------------------------------
	| oAuth Config
	|--------------------------------------------------------------------------
	*/

	/**
	 * Storage
	 */
	'storage' => '\\OAuth\\Common\\Storage\\Session',

	/**
	 * Consumers
	 */
	'consumers' => [

		'Tumblr' => [
			'client_id'     => env('TUMBLR_CLIENT_ID'),
			'client_secret' => env('TUMBLR_CLIENT_SECRET'),
			// No scope - oauth1 doesn't need scope
		],

	]

];

.env に Consumer Key, Consumer Secret を追加

TUMBLR_CLIENT_ID=Your-Consumer-Key
TUMBLR_CLIENT_SECRET=Your-Consumer-Secret

OAuth 認証プログラム

app/Http/Controllers/TumblrAuthController.php

<?php

namespace App\Http\Controllers;

use Illuminate\Http\Request;

class TumblrAuthController extends Controller
{
	public function loginWithTumblr(Request $request)
	{
		// get data from request
		$token  = $request->get('oauth_token');
		$verify = $request->get('oauth_verifier');
		
		// get tumblr service
		$tmb = \OAuth::consumer('Tumblr');
		
		// check if code is valid
		
		// if code is provided get user data and sign in
		if ( ! is_null($token) && ! is_null($verify))
		{
			// This was a callback request from tumblr, get the token
			$token = $tmb->requestAccessToken($token, $verify);
			
			//Var_dump
			//display whole array.
			dd($token);
		}
		// if not ask for permission first
		else
		{
			// get request token
			$reqToken = $tmb->requestRequestToken();
			
			// get Authorization Uri sending the request token
			$url = $tmb->getAuthorizationUri(['oauth_token' => $reqToken->getRequestToken()]);

			// return to tumblr login url
			return redirect((string)$url);
		}
	}
}

routes/web.php

<?php

/*
|--------------------------------------------------------------------------
| Web Routes
|--------------------------------------------------------------------------
|
| Here is where you can register web routes for your application. These
| routes are loaded by the RouteServiceProvider within a group which
| contains the "web" middleware group. Now create something great!
|
*/

Route::get('/tumblr', 'TumblrAuthController@loginWithTumblr');

OAuth 認証プログラムの実行

以下のコマンドで開発用サーバーが起動します

$ php artisan serve

web ブラウザで http://127.0.0.1:8000/tumblr にアクセスします
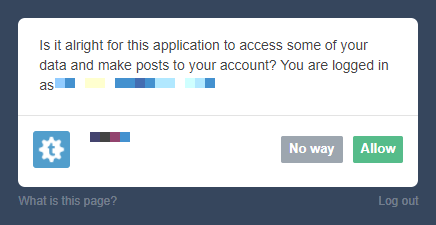
途中、以下の画面が表示されたときは Allow をクリックします
f:id:takaya030:20170818161156p:plain

web ブラウザに以下のような Access Token の表示が出れば成功です

StdOAuth1Token {#175 ▼
  #requestToken: "xxxxx...."
  #requestTokenSecret: "xxxxx..."
  #accessTokenSecret: "xxxxx..."
  #accessToken: "xxxxx..."
  #refreshToken: null
  #endOfLife: -9002
  #extraParams: []
}

glide で GAE/Go プロジェクトのパッケージ管理

Google App Engine for Go (GAE/Go) の開発環境に glide でパッケージをインストールする手順メモ

検証環境

Windows10 Home Edition
VirtualBox 5.1.22
Docker version 17.05.0-ce, build 89658be
docker-compose version 1.6.2, build 4d72027

GAE/Go 開発環境について

今回は下記サイトの手順で構築したものを使用します
takaya030.hatenablog.com

GAE/Go 環境での vendoring の注意点

  • app.yaml があるディレクトリ以下の go ファイルはビルド時にすべてリンクされるため、外部パッケージは別ディレクトリにインストールする (パッケージ内で syscall や unsafe を使用しているとエラーになるため、かつ必要なものだけをリンクするようにするため)
  • vendor ディレクトリは $GOPATH/src 以下に配置されていないと import の対象にならない

ディレクトリ構成

上記を踏まえた上でのディレクトリ構成

+---gaego
|   |   docker-compose.yml
|   |   
|   +---config
|   |   
|   +---data
|   |       Dockerfile
|   |   
|   +---glide
|   |       
|   +---sdk
|           Dockerfile
|            
+---logs
|    
+---www
    |       
    +---app
    |       app.yaml
    |       main.go
    |
    +---src
        |
        +---hello
                app.go
                app-engine.go
                app-standalone.go
                hello.go

各種ファイルの詳細

Echo を使って "Hello, World!" を表示するサンプルプログラムです
(前回記事から追加、変更のあるもののみ)

www/app/main.go

package main

import (
	_ "hello"
)

func init() {
}

www/src/hello/app.go

package hello

var e = createMux()

www/src/hello/app-engine.go

// +build appengine

package hello

import (
    "github.com/labstack/echo"
    "github.com/labstack/echo/engine/standard"
    "net/http"
)

func createMux() *echo.Echo {
    e := echo.New()

    // note: we don't need to provide the middleware or static handlers, that's taken care of by the platform
    // app engine has it's own "main" wrapper - we just need to hook echo into the default handler
    s := standard.New("")
    s.SetHandler(e)
    http.Handle("/", s)

    return e
}

// main()は書かなくて良い

www/src/hello/app-standalone.go

// +build !appengine,!appenginevm

package hello

import (
    "github.com/labstack/echo"
    "github.com/labstack/echo/engine/standard"
    "github.com/labstack/echo/middleware"
)

// ログの設定や静的ファイルの場所指定などをしています
func createMux() *echo.Echo {
    e := echo.New()

    e.Use(middleware.Recover())
    e.Use(middleware.Logger())
    e.Use(middleware.Gzip())

    e.Use(middleware.Static("public"))

    return e
}

func main() {
    e.Run(standard.New(":8080"))
}

www/src/hello/hello.go

package hello

import (
    "net/http"

    "github.com/labstack/echo"
    "github.com/labstack/echo/engine/standard"
    "github.com/rs/cors"
)

func init() {

    g := e.Group("/hello")
    g.Use(standard.WrapMiddleware(cors.Default().Handler))

    g.GET("", getWorld)
    g.GET("/:id", getUser)
}

func getWorld(c echo.Context) error {
    return c.String(http.StatusOK, "Hello, World!")
}

func getUser(c echo.Context) error {
    return c.String(http.StatusOK, "Hello, " + c.P(0) + "!")
}

glide のインストール

$ cd gaego
$ docker-compose run --rm sdk go get github.com/Masterminds/glide

glide.yaml の作成

$ cd gaego
$ docker-compose run --rm sdk /bin/bash -c "cd src/hello;glide create"
Starting gaego_data_1
[INFO]  Generating a YAML configuration file and guessing the dependencies
[INFO]  Attempting to import from other package managers (use --skip-import to skip)
[INFO]  Scanning code to look for dependencies
[INFO]  --> Found reference to github.com/labstack/echo
[INFO]  --> Adding sub-package engine/standard to github.com/labstack/echo
[INFO]  --> Adding sub-package middleware to github.com/labstack/echo
[INFO]  --> Found reference to github.com/rs/cors
[INFO]  Writing configuration file (glide.yaml)
[INFO]  Would you like Glide to help you find ways to improve your glide.yaml configuration?
[INFO]  If you want to revisit this step you can use the config-wizard command at any time.
[INFO]  Yes (Y) or No (N)?
N
[INFO]  You can now edit the glide.yaml file. Consider:
[INFO]  --> Using versions and ranges. See https://glide.sh/docs/versions/
[INFO]  --> Adding additional metadata. See https://glide.sh/docs/glide.yaml/
[INFO]  --> Running the config-wizard command to improve the versions in your configuration

glide によるパッケージインストール

上記操作で作成された glide.yaml では Echo の最新版がインストールされますが、go1.6 では動作しないので旧バージョンを指定するように変更します
(glide.yaml 4行目に "version: v2.2.0" を追加)

www/src/hello/glide.yaml

package: hello
import:
- package: github.com/labstack/echo
  version: v2.2.0          # この行を追加
  subpackages:
  - engine/standard
  - middleware
- package: github.com/rs/cors

その後、以下の操作でインストール

$ cd gaego
$ docker-compose run --rm sdk /bin/bash -c "cd src/hello;glide up"
Starting gaego_data_1
[INFO]  Downloading dependencies. Please wait...
[INFO]  --> Fetching github.com/labstack/echo
[INFO]  --> Fetching github.com/rs/cors
[INFO]  --> Setting version for github.com/labstack/echo to v2.2.0.
[INFO]  Resolving imports
[INFO]  --> Fetching github.com/labstack/gommon
[INFO]  --> Fetching github.com/dgrijalva/jwt-go
[INFO]  --> Fetching github.com/mattn/go-isatty
[INFO]  --> Fetching github.com/valyala/fasttemplate
[INFO]  --> Fetching golang.org/x/net
[INFO]  --> Fetching github.com/mattn/go-colorable
[INFO]  --> Fetching golang.org/x/sys
[INFO]  --> Fetching github.com/valyala/bytebufferpool
[INFO]  Downloading dependencies. Please wait...
[INFO]  Setting references for remaining imports
[INFO]  Exporting resolved dependencies...
[INFO]  --> Exporting github.com/valyala/bytebufferpool
[INFO]  --> Exporting github.com/labstack/echo
[INFO]  --> Exporting github.com/dgrijalva/jwt-go
[INFO]  --> Exporting github.com/mattn/go-colorable
[INFO]  --> Exporting github.com/rs/cors
[INFO]  --> Exporting github.com/mattn/go-isatty
[INFO]  --> Exporting github.com/labstack/gommon
[INFO]  --> Exporting github.com/valyala/fasttemplate
[INFO]  --> Exporting golang.org/x/sys
[INFO]  --> Exporting golang.org/x/net
[INFO]  Replacing existing vendor dependencies
[INFO]  Project relies on 10 dependencies.

以上で www/src/hello/vendor 以下に Echo v2 がインストールされました

動作確認

以下のコマンドで開発用サーバーが起動します

$ docker-compose up -d

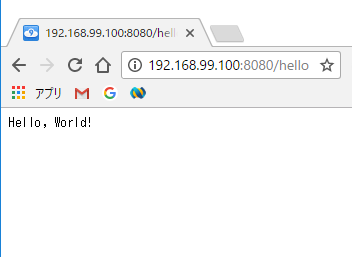
web ブラウザで http://192.168.99.100:8080/hello にアクセスして "Hello, world!" の文字が表示されれば成功です
f:id:takaya030:20170805155642p:plain

http://192.168.99.100:8080/hello/takaya030 にアクセスすると "Hello, takaya030!" と表示されます
f:id:takaya030:20170805155700p:plain