takaya030の備忘録

PHP、Laravel、Docker などの話がメインです

Docker で Amon2 の開発環境を構築

docker-compose を使った Amon2 の開発環境構築の手順メモ

検証環境

Windows10 Home Edition
VirtualBox 5.1.20
Docker version 17.05.0-ce, build 89658be
docker-compose version 1.6.2, build 4d72027

ディレクトリ構成

+---amon
|   |   docker-compose.yml
|   |   
|   +---data
|   |       Dockerfile
|   |       
|   +---perlcli
|           Dockerfile
|            
+---logs
|    
+---www
        cpanfile

各種設定ファイル

amon/docker-compose.yml

version: "2"
services:
  data:
    build: ./data
    volumes:
      - ../:/data
  perlcli:
    build: ./perlcli
    volumes_from:
      - data
  plack:
    image: amon_perlcli
    volumes_from:
      - data
    ports:
      - "3000:3000"
    command: ["carton","exec","--","plackup","-p","3000","-r","myapp/app.psgi"]
    depends_on:
      - perlcli

amon/data/Dockerfile

FROM busybox
LABEL maintainer "takaya030"

RUN mkdir -p /data
VOLUME ["/data"]
CMD ["true"]

amon/perlcli/Dockerfile

FROM perl:5.24.1
LABEL maintainer "takaya030"

WORKDIR /tmp

RUN apt-get update -y && \
	apt-get clean && \
	rm -fr /var/lib/apt/lists/*

# install carton
RUN cpanm Carton

# create docker user
RUN useradd -d /home/docker -m -s /bin/bash -u 1000 -g 50 docker

RUN mkdir -p /data/www
VOLUME ["/data"]
WORKDIR /data/www

USER 1000

CMD ["perl","-v"]

www/cpanfile

requires 'Plack', '1.0044';
requires 'Amon2', '6.13';
requires 'Amon2::Lite', '0.13';

イメージのビルド

amon ディレクトリに移動後、以下のコマンドでイメージをビルドします。

$ docker-compose build

Amon2 と Plack のインストー

イメージビルド後、以下のコマンドで Amon2 と Plack をインストールします。

$ docker-compose run --rm perlcli carton install

動作確認

以下のコマンドでサンプルアプリケーションを作成します。

$ docker-compose run --rm perlcli carton exec -- amon2-setup.pl --flavor=Lite myapp

以下のコマンドで plack サーバーが起動します。

$ docker-compose up -d

web ブラウザで http://192.168.99.100:3000 にアクセスして以下の画面が表示されれば成功です。
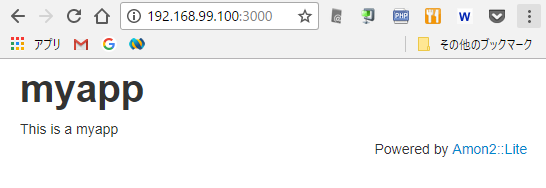
f:id:takaya030:20170618190751p:plain

Terraform で Amazon EC2 に CentOS7 のインスタンスを立てる

Terraform で EC2 に ssh でログイン可能な CentOS7.3 のインスタンスを立てたときの手順メモ

検証環境

Windows10 Home Edition
Terraform v0.9.6

インスタンス作成時の注意点

EC2 に立てた CentOSインスタンスssh でログインするには下記の 2 項目が設定されている必要があります

  1. ログイン認証で使用するキーペア(秘密鍵)
  2. SSHを許可したセキュリティグループ

Terraform のインストー

ダウンロード

こちらのサイトから zip ファイルをダウンロード。解凍した実行ファイルを PATH の通ったフォルダにコピー
www.terraform.io

terraform の動作確認

$ terraform version
Terraform v0.9.6

ディレクトリ構成

+---aws_terraform
        centos7.tf

設定ファイル

aws_terraform/centos7.tf

provider "aws" {
    access_key = "MY ACCESS_KEY"
    secret_key = "MY SECRET_KEY"
    region = "ap-northeast-1"
}

resource "aws_instance" "example" {
    ami = "ami-571e3c30"
    instance_type = "t2.micro"
    key_name = "MY KEY_PAIR"
    security_groups = ["${aws_security_group.centos7_test.name}"]
}

resource "aws_security_group" "centos7_test" {
    name = "centos7_test"
    description = "Used in the terraform"

    # SSH access from anywhere
    ingress {
        from_port = 22
        to_port = 22
        protocol = "tcp"
        cidr_blocks = ["0.0.0.0/0"]

    }

    egress {
        from_port = 0
        to_port = 0
        protocol = "-1"
        cidr_blocks = ["0.0.0.0/0"]
    }
}

最新の CentOS の AMI ID はこちらのサイトで確認できます

インスタンス作成

事前確認

$ cd aws_terraform
$ terraform plan

作成実行

$ terraform apply

インスタンスssh で接続

AWS コンソール "EC2"→"インスタンス"→"接続" からインスタンスの接続方法を確認
下記のコマンドでログイン(ユーザーIDは "centos" )

$ ssh -i my_key_pair.pem centos@ec2-xx-xx-xx-xx.ap-northeast-1.compute.amazonaws.com

インスタンス破棄

事前確認

$ terraform plan -destroy -out=.\terraform.tfplan

破棄実行

$ terraform apply .\terraform.tfplan

Docker で Mojolicious の開発環境を構築

docker-compose を使った Mojolicious の開発環境構築の手順メモ

検証環境

Windows10 Home Edition
VirtualBox 5.1.20
Docker version 17.05.0-ce, build 89658be
docker-compose version 1.6.2, build 4d72027

ディレクトリ構成

+---mojo
|   |   docker-compose.yml
|   |   
|   +---data
|   |       Dockerfile
|   |       
|   +---perlcli
|           Dockerfile
|            
+---logs
|    
+---www
        cpanfile

各種設定ファイル

mojo/docker-compose.yml

version: "2"
services:
  data:
    build: ./data
    volumes:
      - ../:/data
  perlcli:
    build: ./perlcli
    volumes_from:
      - data
  plack:
    image: mojo_perlcli
    volumes_from:
      - data
    ports:
      - "3000:3000"
    command: ["carton","exec","plackup","-p","3000","myapp.pl"]
    depends_on:
      - perlcli

mojo/data/Dockerfile

FROM busybox
LABEL maintainer "takaya030"

RUN mkdir -p /data
VOLUME ["/data"]
CMD ["true"]

mojo/perlcli/Dockerfile

FROM perl:5.24.1
LABEL maintainer "takaya030"

WORKDIR /tmp

RUN apt-get update -y && \
	apt-get clean && \
	rm -fr /var/lib/apt/lists/*

# install carton
RUN cpanm Carton

# create docker user
RUN useradd -d /home/docker -m -s /bin/bash -u 1000 -g 50 docker

RUN mkdir -p /data/www
VOLUME ["/data"]
WORKDIR /data/www

USER 1000

CMD ["perl","-v"]

www/cpanfile

requires 'Plack', '1.0044';
requires 'Mojolicious', '7.31';

イメージのビルド

mojo ディレクトリに移動後、以下のコマンドでイメージをビルドします。

$ docker-compose build

Mojolicious と Plack のインストー

イメージビルド後、以下のコマンドで Mojolicious と Plack をインストールします。

$ docker-compose run --rm perlcli carton install

動作確認

以下のコマンドでサンプルアプリケーションを作成します。

$ docker-compose run --rm perlcli carton exec -- mojo generate lite_app myapp.pl

以下のコマンドで plack サーバーが起動します。

$ docker-compose up -d

web ブラウザで http://192.168.99.100:3000 にアクセスして以下の画面が表示されれば成功です。
f:id:takaya030:20170530233327p:plain

Docker で nginx + php-fpm + Larvel5.4 の環境構築

こちらの記事を参考に Docker で Laravel5.4 の開発環境を構築したときの手順メモ
(フロントエンド関連ツールは省いています)
qiita.com

ディレクトリ構成

+---la54
|   |   docker-compose.yml
|   |   
|   +---composer
|   |       Dockerfile
|   |       
|   +---data
|   |       Dockerfile
|   |       
|   +---fpm
|   |       Dockerfile
|   |       
|   +---nginx
|   |       Dockerfile
|   |       server.conf
|   |       
|   +---phpcli
|           Dockerfile
|            
+---logs
|    
+---www

各種設定ファイル

la54/docker-compose.yml

version: "2"
services:
  data:
    build: ./data
    volumes:
      - ../:/data
  fpm:
    build: ./fpm
    volumes_from:
      - data
  nginx:
    build: ./nginx
    volumes_from:
      - data
    links:
      - fpm:fpm
    ports:
      - "80:80"
  composer:
    build: ./composer
    volumes_from:
      - data
  phpcli:
    build: ./phpcli
    volumes_from:
      - data

la54/composer/Dockerfile

FROM php:7.1.4-cli
LABEL maintainer "takaya030"

WORKDIR /tmp

RUN apt-get update -y && \
	apt-get install -y git unzip sudo && \
	apt-get clean

# create docker user
RUN useradd -d /home/docker -m -s /bin/bash -u 1000 -g 50 docker

# install composer
RUN curl -sS https://getcomposer.org/installer | php && \
	mv composer.phar /usr/local/bin/composer && \
	composer self-update

ENV COMPOSER_HOME /home/docker/.composer
RUN sudo -u docker composer global require hirak/prestissimo

RUN mkdir -p /data/www
VOLUME ["/data"]
WORKDIR /data/www

USER 1000

ENTRYPOINT ["composer"]
CMD ["--help"]

la54/data/Dockerfile

FROM busybox
LABEL maintainer "takaya030"

RUN mkdir -p /data
VOLUME ["/data"]
CMD ["true"]

la54/fpm/Dockerfile

FROM php:7.1.4-fpm
LABEL maintainer "takaya030"

RUN apt-get update && \
  apt-get install -y libfreetype6-dev libjpeg62-turbo-dev libpng12-dev libmcrypt-dev && \
  docker-php-ext-install pdo_mysql mysqli mbstring gd iconv mcrypt && \
  apt-get clean

RUN mkdir -p /data
VOLUME ["/data"]

la54/nginx/Dockerfile

FROM nginx:latest
LABEL maintainer "takaya030"

ADD server.conf /etc/nginx/conf.d/server.conf

RUN mkdir -p /data
VOLUME ["/data"]

la54/nginx/server.conf

server {
    listen 80 default;
    server_name _;
    root /data/www/public;
    index index.php index.html index.htm;
    charset utf-8;

    access_log /data/logs/access_log;
    error_log /data/logs/error.log warn;

    location / {
        try_files $uri $uri/ /index.php$is_args$args;
    }

    location ~ ^/index.php$ {
        fastcgi_pass fpm:9000;
        fastcgi_index index.php;
        fastcgi_param SCRIPT_FILENAME  $document_root$fastcgi_script_name;
        include       fastcgi_params;
    }
}

la54/phpcli/Dockerfile

FROM php:7.1.4-cli
LABEL maintainer "takaya030"

RUN apt-get update && \
  apt-get install -y libfreetype6-dev libjpeg62-turbo-dev libpng12-dev libmcrypt-dev && \
  docker-php-ext-install pdo_mysql mysqli mbstring gd iconv mcrypt && \
  apt-get clean

RUN mkdir -p /data/www
VOLUME ["/data"]
WORKDIR /data/www

ENTRYPOINT ["php"]
CMD ["--version"]

使用方法

la54 ディレクトリに移動後、docker-compose を実行。

# nginx, php-fpm コンテナの起動
$ docker-compose up -d

# Laravel のインストール (最後のピリオドを忘れずに)
$ docker-compose run --rm composer create-project laravel/laravel .

# composer パッケージのアップデート
$ docker-compose run --rm composer update

# artisan コマンド
$ docker-compose run --rm phpcli artisan list

変更履歴

  • (2017/05/24) composer の実行ユーザーを docker に変更
  • (2017/06/27) composer の hirak/prestissimo プラグインが機能していなかったのを修正

minikube で Windows 上に Kubernetes 環境を構築する

minikube で Windows + VirtualBox に Kubernetes 環境をセットアップしたときの手順メモ

検証環境

Windows10 Home Edition
VirtualBox 5.1.20

minikube のダウンロード

下記のリンクから最新の Windows 用の exe (minikube-windows-amd64.exe) をダウンロードします。(2017年4月30日現在の最新バージョンは v0.18.0 です)

minikube のインストール

ダウンロードしたファイルは minikube.exe とリネームしてパスの通ったフォルダにコピーします。

minikube の config 設定

デフォルトの vm driver を VirtualBox にするため、コマンドプロンプトで以下のコマンドを入力

C:\> minikube config set vm-driver virtualbox

kubectl の インストール

kubectl がインストールされていない場合、以下のメッセージが表示されます
メッセージに表示された URL から kubectl.exe をダウンロードしてパスの通ったフォルダに配置します

C:\> minikube config set vm-driver virtualbox
========================================
kubectl could not be found on your path.  kubectl is a requirement for using minikube
To install kubectl, please do the following:

download kubectl from:
https://storage.googleapis.com/kubernetes-release/release/v1.6.0/bin/windows/amd64/kubectl.exe
Add kubectl to your system PATH

To disable this message, run the following:

minikube config set WantKubectlDownloadMsg false
========================================
These changes will take effect upon a minikube delete and then a minikube start

kubectl.exe が使用可能なときは以下のように警告メッセージが表示されません

C:\>minikube config set vm-driver virtualbox
These changes will take effect upon a minikube delete and then a minikube start

Kubernates クラスタの作成

"minikube start" で Kubernetes クラスタを作成します。このコマンドは %USERPROFILE% と異なるドライブで実行した場合エラーになることがあります。

C:\>minikube start
Starting local Kubernetes cluster...
Starting VM...
Downloading Minikube ISO
 89.51 MB / 89.51 MB [=============================================] 100.00% 0s
SSH-ing files into VM...
Setting up certs...
Starting cluster components...
Connecting to cluster...
Setting up kubeconfig...
Kubectl is now configured to use the cluster.

"kubectl version" で以下のようにサーバーバージョンが取得できた場合、Kubernetes クラスタが正常に作成されています

C:\>kubectl version
Client Version: version.Info{Major:"1", takaya030:"6", GitVersion:"v1.6.0", GitCommit:"fff5156092b56e6bd60fff75aad4dc9de6b6ef37", GitTreeState:"clean", BuildDate:"2017-03-28T16:36:33Z", GoVersion:"go1.7.5", Compiler:"gc", Platform:"windows/amd64"}
Server Version: version.Info{Major:"1", takaya030:"6", GitVersion:"v1.6.0", GitCommit:"fff5156092b56e6bd60fff75aad4dc9de6b6ef37", GitTreeState:"dirty", BuildDate:"2017-04-07T20:46:46Z", GoVersion:"go1.7.3", Compiler:"gc", Platform:"linux/amd64"}

Kubernetes クラスタの停止

"minikube stop" で停止します

C:\>minikube stop
Stopping local Kubernetes cluster...
Machine stopped.

Docker コンテナの中で NetBeans を起動する

ubuntu desktop のイメージを使って NetBeans を起動し、VNC 接続を検証したときの手順メモ

Docker 環境

Windows10 Home Edition
VirtualBox 5.1.6
docker 1.10.3
docker-machine 0.6.0

各種設定ファイル

Dockerfile

FROM dorowu/ubuntu-desktop-lxde-vnc 
LABEL maintainer "takaya030"

RUN sed 's/main$/main universe/' -i /etc/apt/sources.list && \
    apt-get update && apt-get install -y software-properties-common && \
    add-apt-repository ppa:webupd8team/java -y && \
    apt-get update && \
    echo oracle-java8-installer shared/accepted-oracle-license-v1-1 select true | /usr/bin/debconf-set-selections && \
    apt-get install -y oracle-java8-installer && \
    apt-get clean && \
    rm -rf /var/lib/apt/lists/* && \
    rm -rf /tmp/*

ADD state.xml /tmp/state.xml

RUN wget http://download.netbeans.org/netbeans/8.2/final/bundles/netbeans-8.2-php-linux-x64.sh -O /tmp/netbeans.sh -q && \
    chmod +x /tmp/netbeans.sh && \
    echo 'Installing netbeans' && \
    /tmp/netbeans.sh --silent --state /tmp/state.xml && \
    rm -rf /tmp/*

ADD run /usr/local/bin/netbeans

state.xml

<?xml version="1.0" encoding="UTF-8"?><!--
  DO NOT ALTER OR REMOVE COPYRIGHT NOTICES OR THIS HEADER.
  Copyright 1997-2010 Oracle and/or its affiliates. All rights reserved.
  Oracle and Java are registered trademarks of Oracle and/or its affiliates.
  Other names may be trademarks of their respective owners.
  The contents of this file are subject to the terms of either the GNU General Public
  License Version 2 only ("GPL") or the Common Development and Distribution
  License("CDDL") (collectively, the "License"). You may not use this file except in
  compliance with the License. You can obtain a copy of the License at
  http://www.netbeans.org/cddl-gplv2.html or nbbuild/licenses/CDDL-GPL-2-CP. See the
  License for the specific language governing permissions and limitations under the
  License.  When distributing the software, include this License Header Notice in
  each file and include the License file at nbbuild/licenses/CDDL-GPL-2-CP.  Oracle
  designates this particular file as subject to the "Classpath" exception as provided
  by Oracle in the GPL Version 2 section of the License file that accompanied this code.
  If applicable, add the following below the License Header, with the fields enclosed
  by brackets [] replaced by your own identifying information:
  "Portions Copyrighted [year] [name of copyright owner]"
  
  Contributor(s):
  
  The Original Software is NetBeans. The Initial Developer of the Original Software
  is Sun Microsystems, Inc. Portions Copyright 1997-2007 Sun Microsystems, Inc. All
  Rights Reserved.
  
  If you wish your version of this file to be governed by only the CDDL or only the
  GPL Version 2, indicate your decision by adding "[Contributor] elects to include
  this software in this distribution under the [CDDL or GPL Version 2] license." If
  you do not indicate a single choice of license, a recipient has the option to
  distribute your version of this file under either the CDDL, the GPL Version 2 or
  to extend the choice of license to its licensees as provided above. However, if you
  add GPL Version 2 code and therefore, elected the GPL Version 2 license, then the
  option applies only if the new code is made subject to such option by the copyright
  holder.
--><state xmlns:xsi="http://www.w3.org/2001/XMLSchema-instance" xsi:noNamespaceSchemaLocation="state-file.xsd">
<components>
        <product platform="windows linux solaris-sparc solaris-x86 macosx-ppc macosx-x86" status="to-be-installed" uid="nb-base" version="8.2.0.0.201609300101">
            <properties>
                <property name="installation.location.windows">$N{install}/NetBeans 8.2</property>
                <property name="minimum.jdk.version">1.8.0</property>
                <property name="jdk.location">/usr/lib/jvm/java-8-oracle</property>
                <property name="installation.timestamp">1485833188374</property>
                <property name="start.menu.shortcut.location">current.user</property>
                <property name="installation.location.macosx">$N{install}/NetBeans/NetBeans 8.2.app</property>
                <property name="installation.location">/usr/local/netbeans-8.2</property>
                <property name="desktop.shortcut.location">current.user</property>
                <property name="netbeans.summary.message.text">101 updates successfully installed.

</property>
            </properties>
        </product>
        <product platform="windows linux solaris-sparc solaris-x86 macosx-ppc macosx-x86" status="to-be-installed" uid="nb-extide" version="8.2.0.0.201609300101">
            <properties>
                <property name="show-in-wizard">false</property>
                <property name="installation.location">/usr/local/netbeans-8.2</property>
            </properties>
        </product>
        <product platform="windows linux solaris-sparc solaris-x86 macosx-ppc macosx-x86" status="to-be-installed" uid="nb-webcommon" version="8.2.0.0.201609300101">
            <properties>
                <property name="installation.location">/usr/local/netbeans-8.2</property>
            </properties>
        </product>
        <product platform="windows linux solaris-sparc solaris-x86 macosx-ppc macosx-x86" status="to-be-installed" uid="nb-php" version="8.2.0.0.201609300101">
            <properties>
                <property name="installation.location">/usr/local/netbeans-8.2</property>
            </properties>
        </product>
        <product platform="windows linux solaris-sparc solaris-x86 macosx-ppc macosx-x86" status="to-be-installed" uid="nb-cnd" version="8.2.0.0.201609300101">
            <properties>
                <property name="installation.location">/usr/local/netbeans-8.2</property>
            </properties>
        </product>
        <product platform="windows linux solaris-sparc solaris-x86 macosx-ppc macosx-x86" status="to-be-installed" uid="nb-ergonomics" version="8.2.0.0.201609300101">
            <properties>
                <property name="installation.location">/usr/local/netbeans-8.2</property>
            </properties>
        </product>
    </components>
</state>

run

#!/bin/bash

# Make sure the user data directory is owned by the ubuntu user
if [ -d /home/ubuntu/.netbeans ]; then
  sudo chown ubuntu:ubuntu /home/ubuntu/.netbeans
fi
exec /usr/local/netbeans-8.2/bin/netbeans

イメージのビルド

$ docker build -t takaya030/netbeans

イメージの確認

$ docker images
REPOSITORY                       TAG                 IMAGE ID            CREATED             SIZE
takaya030/netbeans               latest              a74eced20d24        13 minutes ago      2.09GB
dorowu/ubuntu-desktop-lxde-vnc   latest              54ee7716013e        7 weeks ago         1.23GB

動作確認

$ docker run --rm -it -p 80:80 takaya030/netbeans

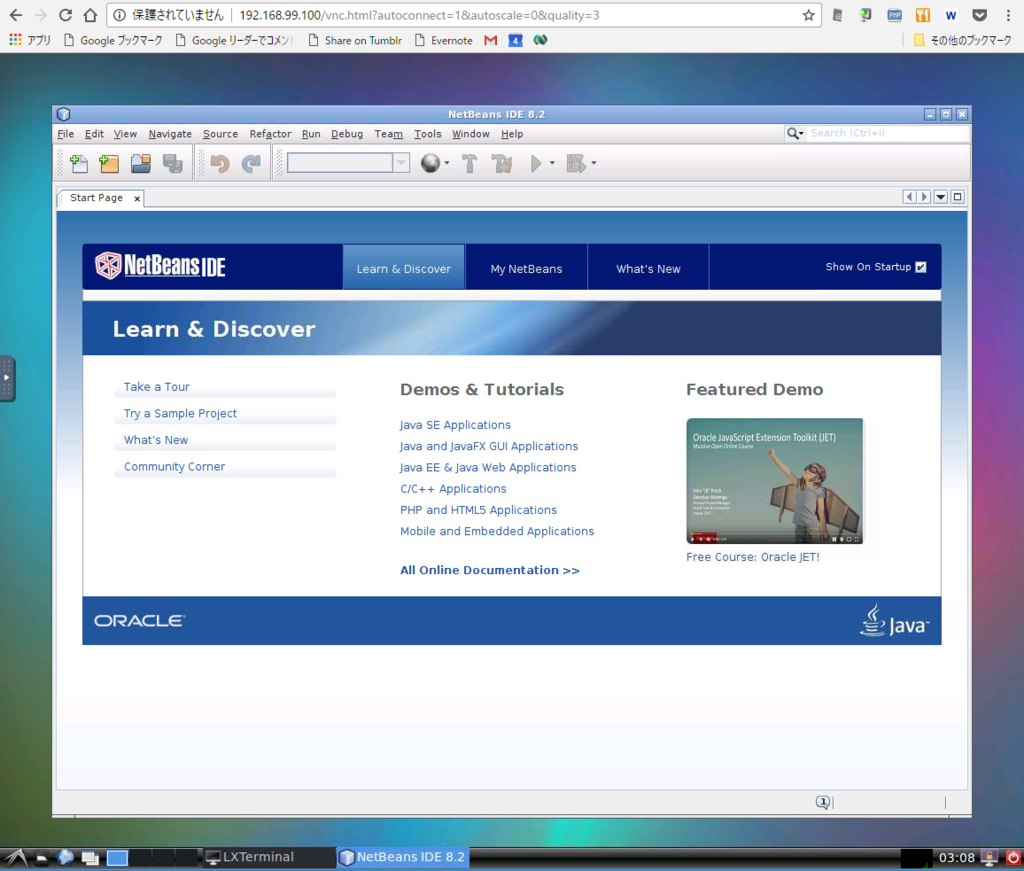
WEBブラウザで "http://192.168.99.100" にアクセスすると ubuntu desktop の画面が表示される
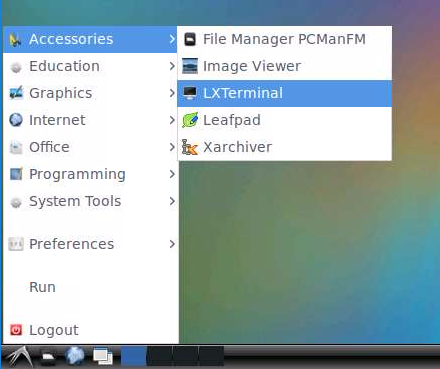
左下のメニューボタンから LXTerminal を起動する
f:id:takaya030:20170423125256p:plain

ターミナルで "/usr/local/bin/netbeans &" と入力する
f:id:takaya030:20170423125318p:plain

NetBeans が起動できれば成功
f:id:takaya030:20170423125339p:plain

Docker で CentOS7 + Apache2.4 + PHP7 環境のイメージを作る

CentOS7 で動作する Apache + PHP の環境を作成したときの手順メモ

Docker 環境

Windows10 Home Edition
VirtualBox 5.1.6
docker 1.10.3
docker-machine 0.6.0

各種設定ファイル

Dockerfile

#
# Apache + PHP
#
# 2017-01-15
#   CentOS 7.3 + epel,remi
#   Apache 2.4.6
#   PHP 7.0.14

FROM centos:7
MAINTAINER takaya030

# update yum
RUN yum update -y && \
    yum clean all

# epel,remi
RUN yum install -y epel-release && \
	yum install -y http://rpms.famillecollet.com/enterprise/remi-release-7.rpm && \
    yum clean all && \
	sed -i -e "s/enabled *= *1/enabled=0/g" /etc/yum.repos.d/epel.repo && \
	sed -i -e "s/enabled *= *1/enabled=0/g" /etc/yum.repos.d/remi.repo

# httpd, sshd, scp, openssl, sudo, which
RUN yum install -y httpd httpd-tools openssh-server openssh-clients openssl sudo which && \
    yum clean all

# libmcrypt, supervisor
RUN yum install --enablerepo=epel -y libmcrypt supervisor && \
    yum clean all

# gd-last (for php-gd)
RUN yum install --enablerepo=remi -y gd-last && \
    yum clean all

# php-pecl-memcached
RUN yum install --enablerepo=remi,remi-php70 -y php-pecl-memcached && \
    yum clean all

# php
RUN yum install --enablerepo=remi-php70 -y php php-devel php-gd php-mbstring php-mcrypt php-mysqlnd php-pear php-xml php-opcache && \
    yum clean all && \
	sed -i -e "s/;date.timezone *=.*$/date.timezone = Asia\/Tokyo/" /etc/php.ini

# composer
RUN curl -sS https://getcomposer.org/installer | php -- --install-dir=/usr/local/bin --filename=composer

# phpunit
RUN curl -L https://phar.phpunit.de/phpunit.phar > /usr/local/bin/phpunit && \
	chmod +x /usr/local/bin/phpunit

# initialize for ssh
RUN sed -i '/pam_loginuid\.so/s/required/optional/' /etc/pam.d/sshd && \
	ssh-keygen -A

# create login user
RUN useradd -d /home/laravel -m -s /bin/bash laravel && \
	echo laravel:****laravel | chpasswd && \
	echo 'laravel ALL=(ALL) NOPASSWD:ALL' >> /etc/sudoers

# timezone
RUN cp -p /usr/share/zoneinfo/Japan /etc/localtime

ENV WEBAPP_ROOT /webapp

ADD ./httpd.conf /etc/httpd/conf/httpd.conf
ADD ./index.html /webapp/public/index.html
ADD ./phpinfo.php /webapp/public/phpinfo.php
ADD ./supervisord.conf /etc/supervisord.conf

EXPOSE 22 80

CMD ["/usr/bin/supervisord"]

index.html

<html>
	<body>
		<h1>It works!</h1>
		<p><a href="./phpinfo.php">phpinfo</a></p>
	</body>
</html>

phpinfo.php

<?php
    phpinfo();

supervisor.conf

長いので diff のみ

--- supervisord.conf.orig	Sun Jan 15 18:31:07 2017
+++ supervisord.conf	Sun Jan 15 19:08:05 2017
@@ -18,7 +18,7 @@
 logfile_backups=10          ; (num of main logfile rotation backups;default 10)
 loglevel=info               ; (log level;default info; others: debug,warn,trace)
 pidfile=/var/run/supervisord.pid ; (supervisord pidfile;default supervisord.pid)
-nodaemon=false              ; (start in foreground if true;default false)
+nodaemon=true              ; (start in foreground if true;default false)
 minfds=1024                 ; (min. avail startup file descriptors;default 1024)
 minprocs=200                ; (min. avail process descriptors;default 200)
 ;umask=022                  ; (process file creation umask;default 022)
@@ -127,3 +127,9 @@
 
 [include]
 files = supervisord.d/*.ini
+
+[program:sshd]
+command=/usr/sbin/sshd -D
+
+[program:httpd]
+command=/usr/sbin/httpd -DFOREGROUND

httpd.conf

長いので diff のみ

--- httpd.conf.orig	Sun Jan 15 18:31:49 2017
+++ httpd.conf	Sun Jan 15 19:38:42 2017
@@ -93,6 +93,7 @@
 # If your host doesn't have a registered DNS name, enter its IP address here.
 #
 #ServerName www.example.com:80
+ServerName webapp:80
 
 #
 # Deny access to the entirety of your server's filesystem. You must
@@ -116,7 +117,8 @@
 # documents. By default, all requests are taken from this directory, but
 # symbolic links and aliases may be used to point to other locations.
 #
-DocumentRoot "/var/www/html"
+#DocumentRoot "/var/www/html"
+DocumentRoot "${WEBAPP_ROOT}/public"
 
 #
 # Relax access to content within /var/www.
@@ -128,7 +130,8 @@
 </Directory>
 
 # Further relax access to the default document root:
-<Directory "/var/www/html">
+#<Directory "/var/www/html">
+<Directory "${WEBAPP_ROOT}/public">
     #
     # Possible values for the Options directive are "None", "All",
     # or any combination of:
@@ -148,7 +151,7 @@
     # It can be "All", "None", or any combination of the keywords:
     #   Options FileInfo AuthConfig Limit
     #
-    AllowOverride None
+    AllowOverride All
 
     #
     # Controls who can get stuff from this server.
@@ -161,7 +164,7 @@
 # is requested.
 #
 <IfModule dir_module>
-    DirectoryIndex index.html
+    DirectoryIndex index.php index.html
 </IfModule>
 
 #

httpd.conf と supervisor.conf の完全版はこちらに置いてあります
centos7_httpd.conf GitHub

イメージのビルド

$ docker build -t takaya030/webapp

イメージの確認

$ docker images
REPOSITORY                         TAG                 IMAGE ID            CREATED             SIZE
takaya030/webapp                   latest              46e548051792        3 hours ago         528 MB
centos                             7                   67591570dd29        4 weeks ago         191.8 MB

動作確認

$ docker run -d -p 80:80 -p 2022:22 --name webapp takaya030/webapp

WEBブラウザで "http://192.168.99.100" にアクセスして下の画像のように表示されれば動作しています。
f:id:takaya030:20150902010402p:plain