takaya030の備忘録

PHP、Laravel、Docker などの話がメインです

Docker コンテナの中で NetBeans を起動する

ubuntu desktop のイメージを使って NetBeans を起動し、VNC 接続を検証したときの手順メモ

Docker 環境

Windows10 Home Edition
VirtualBox 5.1.6
docker 1.10.3
docker-machine 0.6.0

各種設定ファイル

Dockerfile

FROM dorowu/ubuntu-desktop-lxde-vnc 
LABEL maintainer "takaya030"

RUN sed 's/main$/main universe/' -i /etc/apt/sources.list && \
    apt-get update && apt-get install -y software-properties-common && \
    add-apt-repository ppa:webupd8team/java -y && \
    apt-get update && \
    echo oracle-java8-installer shared/accepted-oracle-license-v1-1 select true | /usr/bin/debconf-set-selections && \
    apt-get install -y oracle-java8-installer && \
    apt-get clean && \
    rm -rf /var/lib/apt/lists/* && \
    rm -rf /tmp/*

ADD state.xml /tmp/state.xml

RUN wget http://download.netbeans.org/netbeans/8.2/final/bundles/netbeans-8.2-php-linux-x64.sh -O /tmp/netbeans.sh -q && \
    chmod +x /tmp/netbeans.sh && \
    echo 'Installing netbeans' && \
    /tmp/netbeans.sh --silent --state /tmp/state.xml && \
    rm -rf /tmp/*

ADD run /usr/local/bin/netbeans

state.xml

<?xml version="1.0" encoding="UTF-8"?><!--
  DO NOT ALTER OR REMOVE COPYRIGHT NOTICES OR THIS HEADER.
  Copyright 1997-2010 Oracle and/or its affiliates. All rights reserved.
  Oracle and Java are registered trademarks of Oracle and/or its affiliates.
  Other names may be trademarks of their respective owners.
  The contents of this file are subject to the terms of either the GNU General Public
  License Version 2 only ("GPL") or the Common Development and Distribution
  License("CDDL") (collectively, the "License"). You may not use this file except in
  compliance with the License. You can obtain a copy of the License at
  http://www.netbeans.org/cddl-gplv2.html or nbbuild/licenses/CDDL-GPL-2-CP. See the
  License for the specific language governing permissions and limitations under the
  License.  When distributing the software, include this License Header Notice in
  each file and include the License file at nbbuild/licenses/CDDL-GPL-2-CP.  Oracle
  designates this particular file as subject to the "Classpath" exception as provided
  by Oracle in the GPL Version 2 section of the License file that accompanied this code.
  If applicable, add the following below the License Header, with the fields enclosed
  by brackets [] replaced by your own identifying information:
  "Portions Copyrighted [year] [name of copyright owner]"
  
  Contributor(s):
  
  The Original Software is NetBeans. The Initial Developer of the Original Software
  is Sun Microsystems, Inc. Portions Copyright 1997-2007 Sun Microsystems, Inc. All
  Rights Reserved.
  
  If you wish your version of this file to be governed by only the CDDL or only the
  GPL Version 2, indicate your decision by adding "[Contributor] elects to include
  this software in this distribution under the [CDDL or GPL Version 2] license." If
  you do not indicate a single choice of license, a recipient has the option to
  distribute your version of this file under either the CDDL, the GPL Version 2 or
  to extend the choice of license to its licensees as provided above. However, if you
  add GPL Version 2 code and therefore, elected the GPL Version 2 license, then the
  option applies only if the new code is made subject to such option by the copyright
  holder.
--><state xmlns:xsi="http://www.w3.org/2001/XMLSchema-instance" xsi:noNamespaceSchemaLocation="state-file.xsd">
<components>
        <product platform="windows linux solaris-sparc solaris-x86 macosx-ppc macosx-x86" status="to-be-installed" uid="nb-base" version="8.2.0.0.201609300101">
            <properties>
                <property name="installation.location.windows">$N{install}/NetBeans 8.2</property>
                <property name="minimum.jdk.version">1.8.0</property>
                <property name="jdk.location">/usr/lib/jvm/java-8-oracle</property>
                <property name="installation.timestamp">1485833188374</property>
                <property name="start.menu.shortcut.location">current.user</property>
                <property name="installation.location.macosx">$N{install}/NetBeans/NetBeans 8.2.app</property>
                <property name="installation.location">/usr/local/netbeans-8.2</property>
                <property name="desktop.shortcut.location">current.user</property>
                <property name="netbeans.summary.message.text">101 updates successfully installed.

</property>
            </properties>
        </product>
        <product platform="windows linux solaris-sparc solaris-x86 macosx-ppc macosx-x86" status="to-be-installed" uid="nb-extide" version="8.2.0.0.201609300101">
            <properties>
                <property name="show-in-wizard">false</property>
                <property name="installation.location">/usr/local/netbeans-8.2</property>
            </properties>
        </product>
        <product platform="windows linux solaris-sparc solaris-x86 macosx-ppc macosx-x86" status="to-be-installed" uid="nb-webcommon" version="8.2.0.0.201609300101">
            <properties>
                <property name="installation.location">/usr/local/netbeans-8.2</property>
            </properties>
        </product>
        <product platform="windows linux solaris-sparc solaris-x86 macosx-ppc macosx-x86" status="to-be-installed" uid="nb-php" version="8.2.0.0.201609300101">
            <properties>
                <property name="installation.location">/usr/local/netbeans-8.2</property>
            </properties>
        </product>
        <product platform="windows linux solaris-sparc solaris-x86 macosx-ppc macosx-x86" status="to-be-installed" uid="nb-cnd" version="8.2.0.0.201609300101">
            <properties>
                <property name="installation.location">/usr/local/netbeans-8.2</property>
            </properties>
        </product>
        <product platform="windows linux solaris-sparc solaris-x86 macosx-ppc macosx-x86" status="to-be-installed" uid="nb-ergonomics" version="8.2.0.0.201609300101">
            <properties>
                <property name="installation.location">/usr/local/netbeans-8.2</property>
            </properties>
        </product>
    </components>
</state>

run

#!/bin/bash

# Make sure the user data directory is owned by the ubuntu user
if [ -d /home/ubuntu/.netbeans ]; then
  sudo chown ubuntu:ubuntu /home/ubuntu/.netbeans
fi
exec /usr/local/netbeans-8.2/bin/netbeans

イメージのビルド

$ docker build -t takaya030/netbeans

イメージの確認

$ docker images
REPOSITORY                       TAG                 IMAGE ID            CREATED             SIZE
takaya030/netbeans               latest              a74eced20d24        13 minutes ago      2.09GB
dorowu/ubuntu-desktop-lxde-vnc   latest              54ee7716013e        7 weeks ago         1.23GB

動作確認

$ docker run --rm -it -p 80:80 takaya030/netbeans

WEBブラウザで "http://192.168.99.100" にアクセスすると ubuntu desktop の画面が表示される
左下のメニューボタンから LXTerminal を起動する
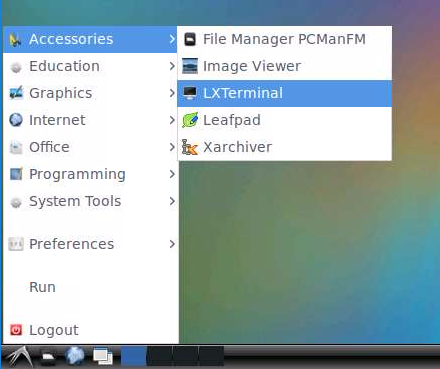
f:id:takaya030:20170423125256p:plain

ターミナルで "/usr/local/bin/netbeans &" と入力する
f:id:takaya030:20170423125318p:plain

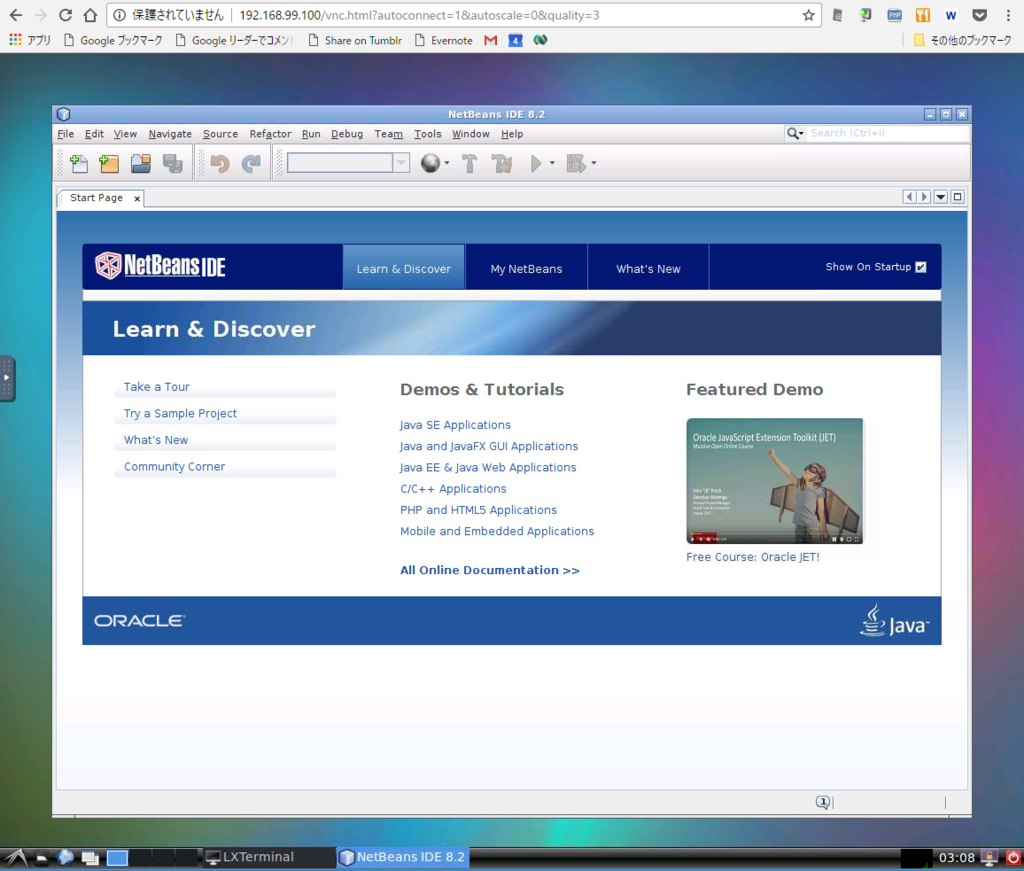
NetBeans が起動できれば成功
f:id:takaya030:20170423125339p:plain

Docker で CentOS7 + Apache2.4 + PHP7 環境のイメージを作る

CentOS7 で動作する Apache + PHP の環境を作成したときの手順メモ

Docker 環境

Windows10 Home Edition
VirtualBox 5.1.6
docker 1.10.3
docker-machine 0.6.0

各種設定ファイル

Dockerfile

#
# Apache + PHP
#
# 2017-01-15
#   CentOS 7.3 + epel,remi
#   Apache 2.4.6
#   PHP 7.0.14

FROM centos:7
MAINTAINER takaya030

# update yum
RUN yum update -y && \
    yum clean all

# epel,remi
RUN yum install -y epel-release && \
	yum install -y http://rpms.famillecollet.com/enterprise/remi-release-7.rpm && \
    yum clean all && \
	sed -i -e "s/enabled *= *1/enabled=0/g" /etc/yum.repos.d/epel.repo && \
	sed -i -e "s/enabled *= *1/enabled=0/g" /etc/yum.repos.d/remi.repo

# httpd, sshd, scp, openssl, sudo, which
RUN yum install -y httpd httpd-tools openssh-server openssh-clients openssl sudo which && \
    yum clean all

# libmcrypt, supervisor
RUN yum install --enablerepo=epel -y libmcrypt supervisor && \
    yum clean all

# gd-last (for php-gd)
RUN yum install --enablerepo=remi -y gd-last && \
    yum clean all

# php-pecl-memcached
RUN yum install --enablerepo=remi,remi-php70 -y php-pecl-memcached && \
    yum clean all

# php
RUN yum install --enablerepo=remi-php70 -y php php-devel php-gd php-mbstring php-mcrypt php-mysqlnd php-pear php-xml php-opcache && \
    yum clean all && \
	sed -i -e "s/;date.timezone *=.*$/date.timezone = Asia\/Tokyo/" /etc/php.ini

# composer
RUN curl -sS https://getcomposer.org/installer | php -- --install-dir=/usr/local/bin --filename=composer

# phpunit
RUN curl -L https://phar.phpunit.de/phpunit.phar > /usr/local/bin/phpunit && \
	chmod +x /usr/local/bin/phpunit

# initialize for ssh
RUN sed -i '/pam_loginuid\.so/s/required/optional/' /etc/pam.d/sshd && \
	ssh-keygen -A

# create login user
RUN useradd -d /home/laravel -m -s /bin/bash laravel && \
	echo laravel:****laravel | chpasswd && \
	echo 'laravel ALL=(ALL) NOPASSWD:ALL' >> /etc/sudoers

# timezone
RUN cp -p /usr/share/zoneinfo/Japan /etc/localtime

ENV WEBAPP_ROOT /webapp

ADD ./httpd.conf /etc/httpd/conf/httpd.conf
ADD ./index.html /webapp/public/index.html
ADD ./phpinfo.php /webapp/public/phpinfo.php
ADD ./supervisord.conf /etc/supervisord.conf

EXPOSE 22 80

CMD ["/usr/bin/supervisord"]

index.html

<html>
	<body>
		<h1>It works!</h1>
		<p><a href="./phpinfo.php">phpinfo</a></p>
	</body>
</html>

phpinfo.php

<?php
    phpinfo();

supervisor.conf

長いので diff のみ

--- supervisord.conf.orig	Sun Jan 15 18:31:07 2017
+++ supervisord.conf	Sun Jan 15 19:08:05 2017
@@ -18,7 +18,7 @@
 logfile_backups=10          ; (num of main logfile rotation backups;default 10)
 loglevel=info               ; (log level;default info; others: debug,warn,trace)
 pidfile=/var/run/supervisord.pid ; (supervisord pidfile;default supervisord.pid)
-nodaemon=false              ; (start in foreground if true;default false)
+nodaemon=true              ; (start in foreground if true;default false)
 minfds=1024                 ; (min. avail startup file descriptors;default 1024)
 minprocs=200                ; (min. avail process descriptors;default 200)
 ;umask=022                  ; (process file creation umask;default 022)
@@ -127,3 +127,9 @@
 
 [include]
 files = supervisord.d/*.ini
+
+[program:sshd]
+command=/usr/sbin/sshd -D
+
+[program:httpd]
+command=/usr/sbin/httpd -DFOREGROUND

httpd.conf

長いので diff のみ

--- httpd.conf.orig	Sun Jan 15 18:31:49 2017
+++ httpd.conf	Sun Jan 15 19:38:42 2017
@@ -93,6 +93,7 @@
 # If your host doesn't have a registered DNS name, enter its IP address here.
 #
 #ServerName www.example.com:80
+ServerName webapp:80
 
 #
 # Deny access to the entirety of your server's filesystem. You must
@@ -116,7 +117,8 @@
 # documents. By default, all requests are taken from this directory, but
 # symbolic links and aliases may be used to point to other locations.
 #
-DocumentRoot "/var/www/html"
+#DocumentRoot "/var/www/html"
+DocumentRoot "${WEBAPP_ROOT}/public"
 
 #
 # Relax access to content within /var/www.
@@ -128,7 +130,8 @@
 </Directory>
 
 # Further relax access to the default document root:
-<Directory "/var/www/html">
+#<Directory "/var/www/html">
+<Directory "${WEBAPP_ROOT}/public">
     #
     # Possible values for the Options directive are "None", "All",
     # or any combination of:
@@ -148,7 +151,7 @@
     # It can be "All", "None", or any combination of the keywords:
     #   Options FileInfo AuthConfig Limit
     #
-    AllowOverride None
+    AllowOverride All
 
     #
     # Controls who can get stuff from this server.
@@ -161,7 +164,7 @@
 # is requested.
 #
 <IfModule dir_module>
-    DirectoryIndex index.html
+    DirectoryIndex index.php index.html
 </IfModule>
 
 #

httpd.conf と supervisor.conf の完全版はこちらに置いてあります
centos7_httpd.conf GitHub

イメージのビルド

$ docker build -t takaya030/webapp

イメージの確認

$ docker images
REPOSITORY                         TAG                 IMAGE ID            CREATED             SIZE
takaya030/webapp                   latest              46e548051792        3 hours ago         528 MB
centos                             7                   67591570dd29        4 weeks ago         191.8 MB

動作確認

$ docker run -d -p 80:80 -p 2022:22 --name webapp takaya030/webapp

WEBブラウザで "http://192.168.99.100" にアクセスして下の画像のように表示されれば動作しています。
f:id:takaya030:20150902010402p:plain

Windows の git bash (msysgit) 環境の Docker コマンドを手動アップグレード

msysgit にインストールされた docker コマンドを手動アップグレードしたときの手順メモ

動作環境

Windows10 Home Edition
VirtualBox 5.1.6
docker 1.10.3
docker-machine 0.6.0

docker コマンドの最新バージョン

2017/1/1 現在の Latest Release バージョン

docker 1.12.5

dokcer コマンドのダウンロード

以下のリンクからダウンロード。解凍した docker.exe を古い exe と入れ替える
Windows 64bits zip: https://get.docker.com/builds/Windows/x86_64/docker-1.12.5.zip

動作確認

$ docker -v
Docker version 1.12.5, build 7392c3b

$ docker images
Error response from daemon: client is newer than server (client API version: 1.24, server API version: 1.22)

Client API バージョンが合っていないためエラーが出ている
docker-machine upgrade で Docker ホスト(CoreOS)のアップグレードをすることで解消される

$ docker-machine upgrade default
Waiting for SSH to be available...
Detecting the provisioner...
Upgrading docker...
Stopping machine to do the upgrade...
Upgrading machine "default"...
Default Boot2Docker ISO is out-of-date, downloading the latest release...
Latest release for github.com/boot2docker/boot2docker is v1.12.5
Downloading C:\Users\takaya030\.docker\machine\cache\boot2docker.iso from https://github.com/boot2docker/boot2docker/releases/download/v1.12.5/boot2docker.iso...
0%....10%....20%....30%....40%....50%....60%....70%....80%....90%....100%
Copying C:\Users\takaya030\.docker\machine\cache\boot2docker.iso to C:\Users\takaya030\.docker\machine\machines\default\boot2docker.iso...
Starting machine back up...
(default) Check network to re-create if needed...
(default) Waiting for an IP...
Restarting docker...

$ docker images
REPOSITORY                         TAG                 IMAGE ID            CREATED             SIZE
mysql                              5.6                 72010d7c69f5        16 months ago       283.6 MB
centos                             6                   93f242d546bd        18 months ago       203.1 MB
busybox                            latest              63e6ca37d7f4        20 months ago       2.433 MB

Windows + VirtualBox + Docker で動作しているコンテナから XAMPP の MySQL へアクセス

前回 Docker コンテナからホスト OS (Windows)へのアクセス可能なことを確認しましたが、今回はその応用でコンテナから XAMPP の MySQL に接続してみます

動作環境

以下の環境で検証しました
VirtualBoxDocker はインストール済みの前提で話を進めます

Windows10 Home Edition
VirtualBox 5.1.6
docker 1.10.3
docker-machine 0.6.0

デフォルトルートの確認

コンテナからホストOS (Windows) へのアクセスはデフォルトルートを通じて行うことが可能です
デフォルトルートは CoreOS 上で "ip r" と入力することで確認可能です

$ ip r
default via 10.0.2.2 dev eth0  metric 1
10.0.2.0/24 dev eth0  proto kernel  scope link  src 10.0.2.15
127.0.0.1 dev lo  scope link
172.17.0.0/16 dev docker0  proto kernel  scope link  src 172.17.0.1
172.18.0.0/16 dev br-5b890ae3c1a7  proto kernel  scope link  src 172.18.0.1
172.19.0.0/16 dev br-0fef2cb04591  proto kernel  scope link  src 172.19.0.1
192.168.99.0/24 dev eth1  proto kernel  scope link  src 192.168.99.100

自分の環境ではデフォルトルートのアドレスは 10.0.2.2 でした

XAMPP の MySQL の起動

xampp-controlMySQL を起動します
f:id:takaya030:20161029191234p:plain

コンテナから XAMPP の MySQL に接続

$ mysql -u root -h 10.0.2.2
Welcome to the MySQL monitor.  Commands end with ; or \g.
Your MySQL connection id is 3
Server version: 5.6.21 MySQL Community Server (GPL)

Copyright (c) 2000, 2015, Oracle and/or its affiliates. All rights reserved.

Oracle is a registered trademark of Oracle Corporation and/or its
affiliates. Other names may be trademarks of their respective
owners.

Type 'help;' or '\h' for help. Type '\c' to clear the current input statement.

以上、コンテナから XAMPP の MySQL にアクセス可能なことが確認できました

Windows + VirtualBox + Docker で動作しているコンテナからホスト OS へのアクセス

Docker コンテナからホスト OS (CoreOS,Windows)へのアクセス方法について

動作環境

以下の環境で検証しました
VirtualBoxDocker はインストール済みの前提で話を進めます

Windows10 Home Edition
VirtualBox 5.1.6
docker 1.10.3
docker-machine 0.6.0

ブリッジインターフェースの確認

Docker のネットワークを管理している仮想ブリッジ "docker0" を確認します。
CoreOS 上で "ip a" と入力することで確認可能です。

$ ip a

7: docker0: <NO-CARRIER,BROADCAST,MULTICAST,UP> mtu 1500 qdisc noqueue state DOWN group default
    link/ether 02:42:d4:14:51:45 brd ff:ff:ff:ff:ff:ff
    inet 172.17.0.1/16 scope global docker0
       valid_lft forever preferred_lft forever

自分の環境では docker0 のアドレスは 172.17.0.1 でした

コンテナから CoreOS へのアクセス

コンテナから CoreOS へのアクセスは仮想ブリッジ "docker0" を通じて行うことが可能です

$ ping 172.17.0.1
PING 172.17.0.1 (172.17.0.1) 56(84) bytes of data.
64 bytes from 172.17.0.1: icmp_seq=1 ttl=64 time=0.784 ms
64 bytes from 172.17.0.1: icmp_seq=2 ttl=64 time=0.098 ms
64 bytes from 172.17.0.1: icmp_seq=3 ttl=64 time=0.086 ms
64 bytes from 172.17.0.1: icmp_seq=4 ttl=64 time=0.085 ms

コンテナから Windows へのアクセス

コンテナから Windows へのアクセスはデフォルトルートを通じて行うことが可能です
デフォルトルートは CoreOS 上で "ip r" と入力することで確認可能です

$ ip r
default via 10.0.2.2 dev eth0  metric 1
10.0.2.0/24 dev eth0  proto kernel  scope link  src 10.0.2.15
127.0.0.1 dev lo  scope link
172.17.0.0/16 dev docker0  proto kernel  scope link  src 172.17.0.1
172.18.0.0/16 dev br-5b890ae3c1a7  proto kernel  scope link  src 172.18.0.1
172.19.0.0/16 dev br-0fef2cb04591  proto kernel  scope link  src 172.19.0.1
192.168.99.0/24 dev eth1  proto kernel  scope link  src 192.168.99.100

自分の環境ではデフォルトルートのアドレスは 10.0.2.2 でした

$ ping 10.0.2.2
PING 10.0.2.2 (10.0.2.2) 56(84) bytes of data.
64 bytes from 10.0.2.2: icmp_seq=1 ttl=62 time=0.226 ms
64 bytes from 10.0.2.2: icmp_seq=2 ttl=62 time=0.466 ms
64 bytes from 10.0.2.2: icmp_seq=3 ttl=62 time=0.537 ms
64 bytes from 10.0.2.2: icmp_seq=4 ttl=62 time=0.435 ms

以上、コンテナから CoreOS、Windows 双方にアクセス可能なことが確認できました

Docker 版 Rails5 で Hello world

Docker で構築した Ruby on Rails5 の環境で "Hello world!" を表示してみる

コントローラ作成

Docker ホストOS 上で下記コマンドで作成

$ docker-compose run --rm web rails generate controller hello
      create  app/controllers/hello_controller.rb
      invoke  erb
      create    app/views/hello
      invoke  test_unit
      create    test/controllers/hello_controller_test.rb
      invoke  helper
      create    app/helpers/hello_helper.rb
      invoke    test_unit
      invoke  assets
      invoke    coffee
      create      app/assets/javascripts/hello.coffee
      invoke    scss
      create      app/assets/stylesheets/hello.scss

index のアクション作成

app/controllers/hello_controller.rb

class HelloController < ApplicationController
	def index
		render :text => "Hello, world!"
	end
end

ルーティング

config/routes.rb

Rails.application.routes.draw do
  # For details on the DSL available within this file, see http://guides.rubyonrails.org/routing.html

  resources :hello do
	  root 'hello#index'
  end
end

動作確認

web ブラウザで http://192.168.99.100:3000/hello を開いて "Hello, world!" と表示されれば成功です

Docker で Rails5 + MySQL の開発環境を構築する

前回 Docker で Ruby on Rails5 のサーバーを単体で起動させましたが、今回は MySQL 連携させてみました。

設定ファイルおよび操作手順について

こちらのサイトに記載されている手順とほぼ同じです。
qiita.com


以下、内容を変更した設定ファイルです。

Dockerfile

#
# ruby 2.3 + rails 5.0.0.1
#
# 2016-10-10
#

FROM ruby:2.3
MAINTAINER takaya030

RUN apt-get update -qq && apt-get install -y build-essential libpq-dev nodejs
RUN mkdir /myapp
WORKDIR /myapp
ADD Gemfile /myapp/Gemfile
ADD Gemfile.lock /myapp/Gemfile.lock
RUN bundle install
ADD . /myapp

Gemfile

source "https://rubygems.org"
gem 'rails', '5.0.0.1'

docker-compose.yml

version: '2'
services:
  db:
    image: mysql:5.6
    container_name: rr5_db
    environment:
      MYSQL_ROOT_PASSWORD: root
  web:
    build: .
    image: rr5_web
    container_name: rr5_web
    command: bundle exec rails s -p 3000 -b '0.0.0.0'
    volumes:
      - .:/myapp
    ports:
      - "3000:3000"
    depends_on:
      - db